 These sensors are usually cheap.
And really easy to use!
An analog sensor is a sensor that gives you a voltage value that represents the measured value.
For example 2V could mean 25 degrees celsius from an analog temperature sensor.
You can find a lot of different sensors that are analog:
temperature light
sound rain
humidity +++
The Arduino has analog inputs that can be used to read these values.
Use the analogRead(pin)-method to read from an analog input pin.
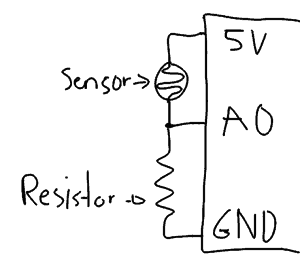
STEP 1: CONNECT YOUR SENSOR
Some sensors come as modules with a pin you can connect directly to the analog input on the Arduino.
Others come as resistive sensors that you need to combine with a resistor to read out it’s value like this:

10 Simple Steps to Learn Electronics
Electronics is easy when you know what to focus on and what to ignore. Learn what "the basics" really is and how to learn it fast.
STEP 2: UPLOAD TEST CODE
Upload test code to test your sensor:
int analogPin = 0; // The analog pin your sensor is connected to
int val = 0; // variable to store the value read
void setup() {
Serial.begin(9600); // setup serial communication
}
void loop() {
val = analogRead(analogPin); // read the input pin
Serial.println(val); // Write value to serial console
}
STEP 3: READ VALUES
Use the “Serial Monitor” under the “Tools” menu to see the sensor readings.
The analog values will be in the range from 0 to 1023:
0 means 0 volts on the analog pin 1023 means 5 volts on the analog pin
STEP 4: CONVERT VALUES
To figure out the reading in a format you know, such as Celsius for temperature, check the datasheet of your sensor and make the necessary calculations in your code.
HOW TO GET STARTED WITH ARDUINO:
Arduino is a really fun board for creating powerful projects such as cell phones, remote controls or fire-breathing ponies.
I wrote a quick intro to Arduino that is available in the «Curious Beginner» and «Dedicated Learner» packages here:
https://www.build-electronic-circuits.com/products/ebook-2nd-edition
Keep on Soldering!
Oyvind
PS! Thank you for all your input on my new membership site. I’m really happy to see all the positive feedback! I still have a job to do going through them all, but I will. And I’ll take every suggestion into account.
More Mail Archive Tutorials

Get Our Basic Electronic Components Guide
Learn how the basic electronic components work so that circuit diagrams will start making sense to you.
Thanks for the clear explaination! I just got into PCBA and such things, since I started working at a company concerned with PCBA (I don’t have a position concerning the technology though). I started researching for a bit, and found out you can do such cool stuff with PCBs! This artice helped me grasp how Arduino circuits work, thank you! I’ll keep reading your blog :)
Andrew