The blinking LED circuit is like the electronics version of the “Hello World”-program. It’s a simple electronic circuit that gives you a visual cue if it works. It was the first circuit I ever built, and it felt GREAT!
The goal is to make a Light Emitting Diode (LED) blink.
Three Different Ways To Build A Blinking LED Circuit
There are several ways of making a blinking LED circuit. You can make one using relays. You can make one using transistors. Or you can make one using components like logic gates, a 555 Timer, or a microcontroller.
I’m going to show you three ways to build a blinking LED circuit using:
- A relay
- Transistors
- A NOT gate (a logic NOT-gate)
Blinking an LED Using Relays
The easiest way to get a light to blink (or at least the easiest to understand) is the following:
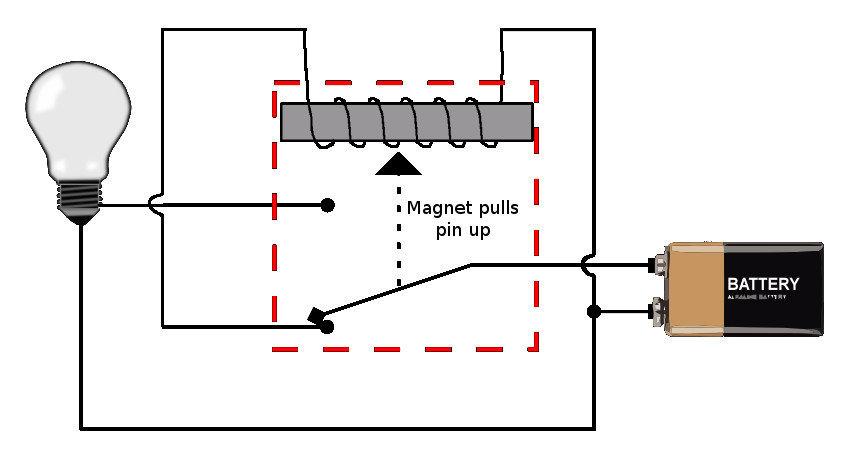
In the above circuit, you see a battery, a relay (in the red square), and a light bulb. To understand the circuit you need to understand how a relay works.
When the relay coil has power, the switch will disconnect the power from the electromagnet and connect the power to the light bulb instead so that it will light up.
But when the relay no longer has power, it will switch back and turn off the power from the light bulb and give power back to the electromagnet again.

10 Simple Steps to Learn Electronics
Electronics is easy when you know what to focus on and what to ignore. Learn what "the basics" really is and how to learn it fast.
Then the cycle starts over.
The problem with the circuit above is that it will switch so fast that you won’t actually see the light blink.
To solve this problem you can introduce a time-delay using a resistor and a capacitor.
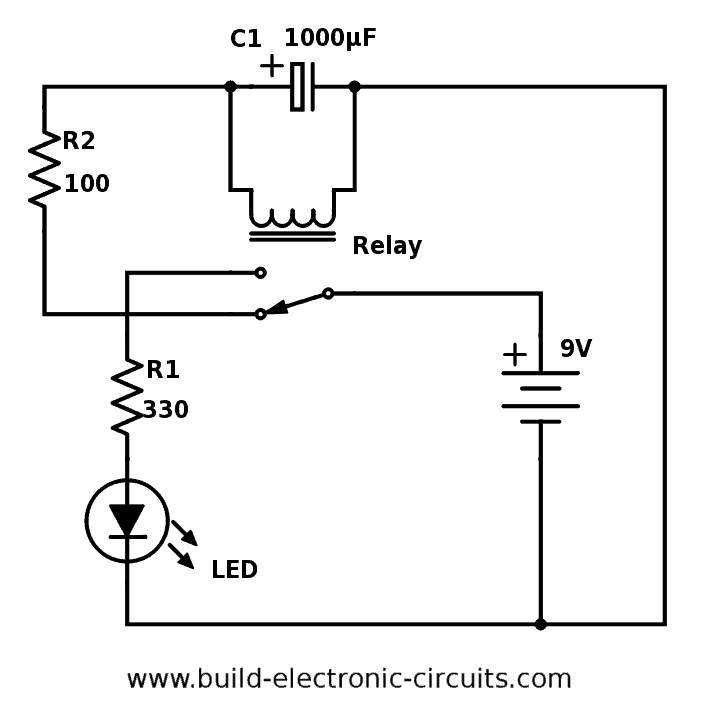
When you apply power to the above circuit, the battery starts charging the capacitor through resistor R2.
After a moment, the relay coil pulls the relay into the other position.
This makes the LED turn ON.
Because the capacitor now is charged, it will hold the relay in this position. But the capacitor only has enough energy to keep the electromagnet in the relay powered for a little bit before it’s empty (or discharged).
When the capacitor is out of energy, the relay goes back into its original state and turns the LED OFF again.
Then the cycle repeats itself.
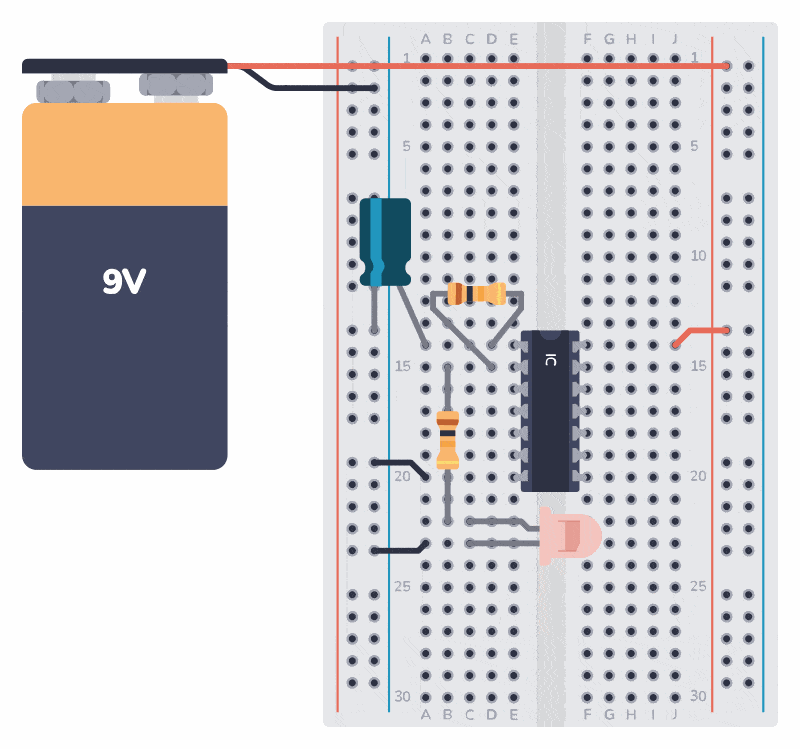
For this circuit with the above component values, I recommend the DS2Y-S-DC5V relay or a similar one. Here’s how you can connect it on a breadboard:

Blinking Two LEDs Using Transistors
The circuit for blinking an LED using transistors is called an Astable Multivibrator.
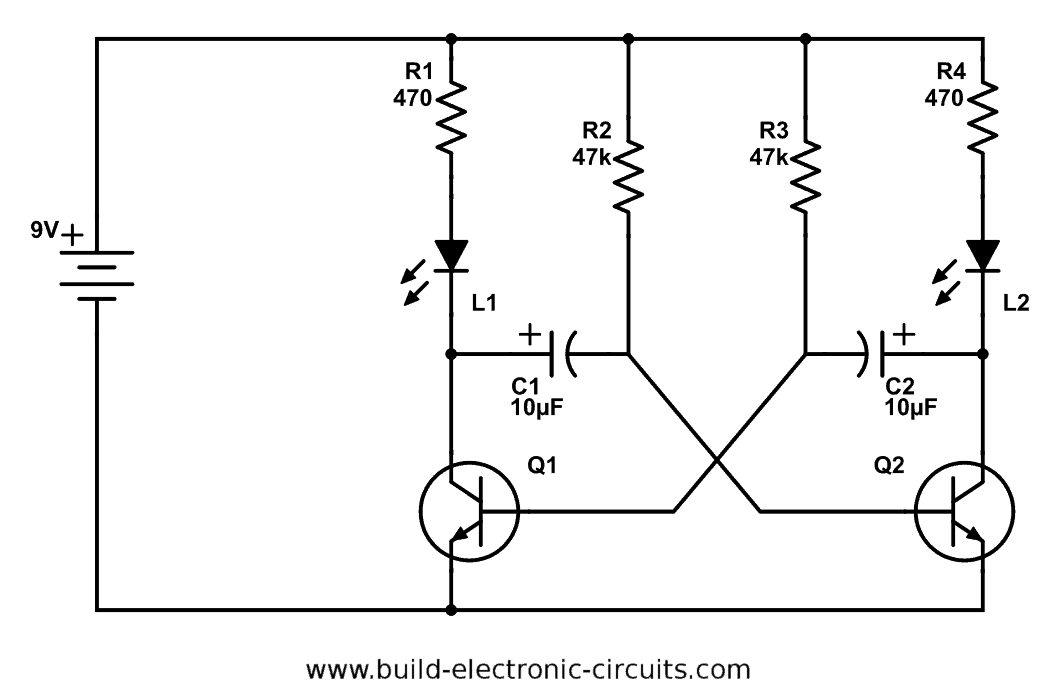
To understand this circuit you need to know how voltages and currents behave around resistors, capacitors, and diodes (which is something you can learn in Ohmify).
Here’s an overview of what happens:
The two capacitors C1 and C2 will alternate between being charged and discharged and thereby turning the transistors ON and OFF. When a transistor is ON it allows current to flow through it so that the LED above it will light up.
If you want to dive into the details, check out my article How Astable Multivibrator Circuits Work.
How To Blink An LED With An Inverter
This is probably the easiest blinking LED circuit when it comes to the number of components: You only need three components for the blinking part!
But you need the resistor and LED to be blinked too of course.
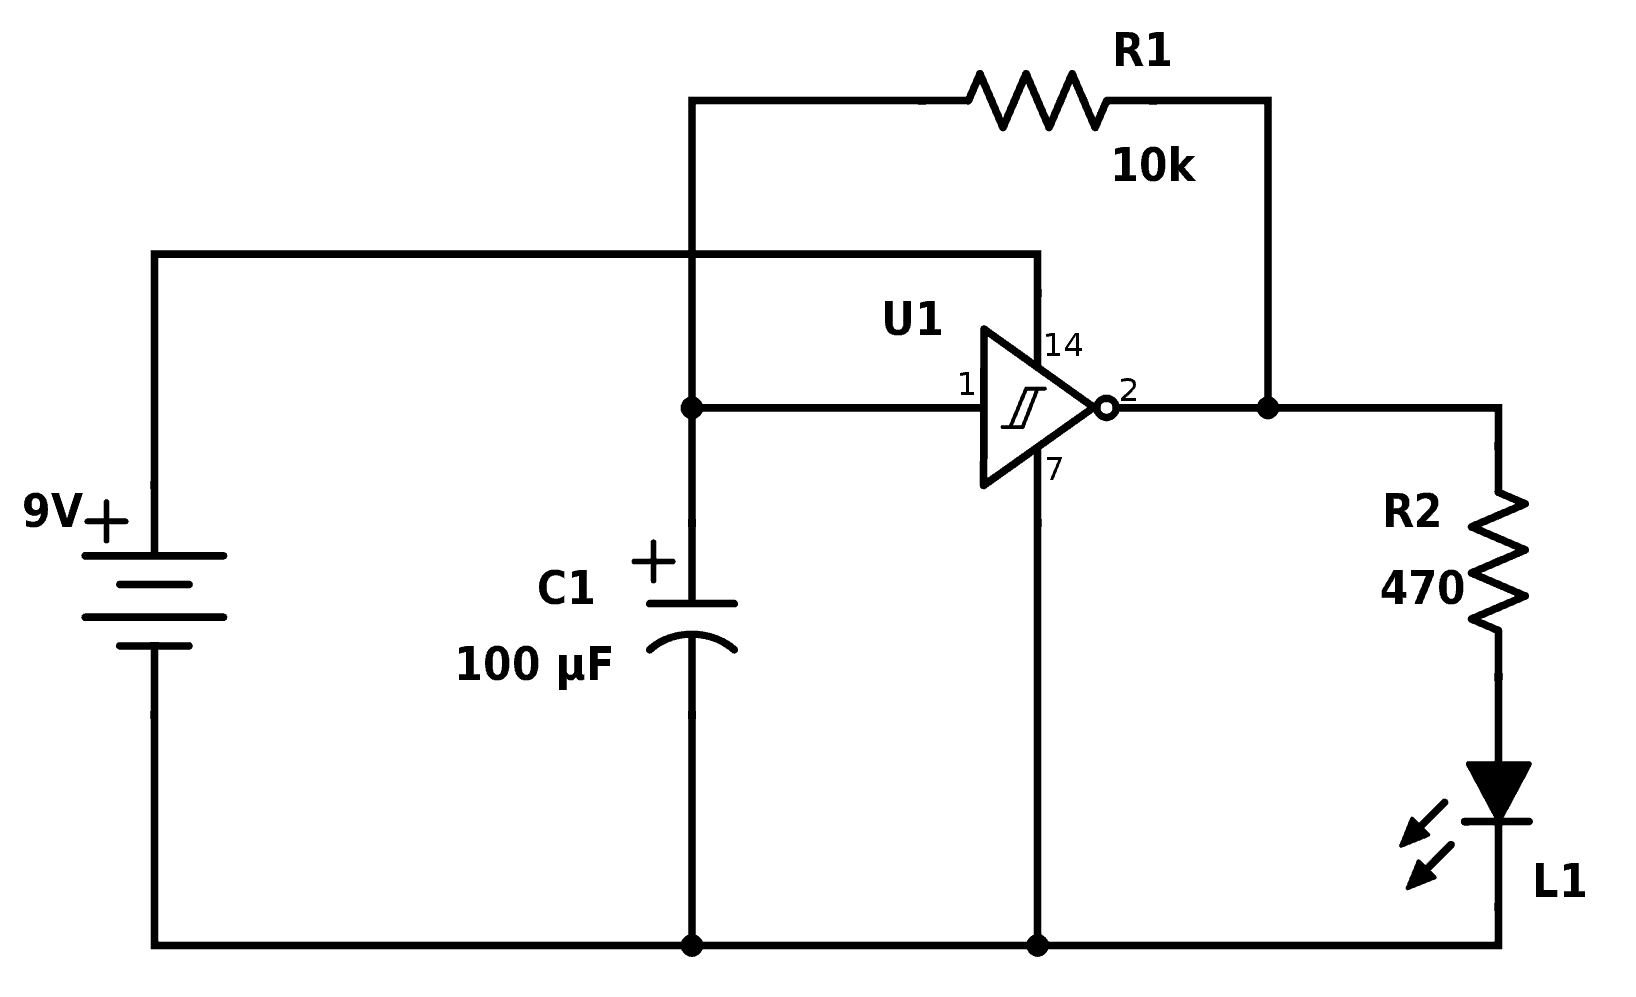
This circuit is from my Free Email Course on how to make a light blink.
I designed the circuit around an inverter.
Also called a NOT-gate.
An inverter is a logical component that outputs the opposite of what it gets in. If it gets a high voltage in, it gives a low voltage out. And vice versa.
A high voltage is a voltage close to the supply voltage. A low voltage is a voltage close to zero volts.
In the circuit diagram, you can see that the output of the inverter (U1) is connected back to the input with a resistor. This means that if there’s a high voltage on the input, the output will be low. But since the output is connected back to the input, the input will be low. Now that the input is low, the output will be high. That means the input will be high again, and so on…
So it will keep jumping between high and low.
To slow down the jumping back and forth, I used a capacitor on the input of the inverter. The resistor R1 controls how much current that goes back to charge the capacitor on the input. The size of the resistor R1 and the capacitor C1 will, therefore, determine the blinking speed.
The inverter I used is a Schmitt Trigger Inverter. Schmitt Trigger just means that the threshold for switching from high to low is different from the threshold for switching from low to high.
Check out the complete build instructions here.

Start Building
Now, you’ve read about ’em. It’s time to start building! Find the parts you need at one of the online shops, order them, and build.
You might also be interested in Ohmify:
Ohmify is an online academy for people with little or no electronics understanding who want to be able to confidently create electronic gadgets and tools – and who are prepared to take action to make it happen.
Click here to learn more about Ohmify.
Did You Build Them?
Have you built a blinking LED circuit from this article?
How did it go?
Let me know in the comment field below.
More Light-Emitting Diodes (LED) Tutorials

Get Our Basic Electronic Components Guide
Learn how the basic electronic components work so that circuit diagrams will start making sense to you.
your explanation on relay circuit is not so clear…..plz elaborate schematics connection and its operation…….capacitor and relay are connected in parallel so it will always turn on the led..
Not sure what you mean.. The circuits are working fine.
Oyvind
Sir thank you for such a great tutorial…..I just want to know which tool you used to draw the schematics????
always current chooses the low resistance path ,so whenever the movable part of the relay is connected to the parallel path of the led, the current prefers to flow through ‘8’ but not ‘4’, because in forward bias the led has 10-100 ohms resistance which is greater than internal resistance of wire.
This is a good explanation of how the relay blinker works. You need to learn how electrons flow through a circuit. Charging and discharging the capacitor slows the switching of the relay so you can see the led turn on and off.
Its clear bro , battery positive is directly to the common while A1 for the coil connected to the Nc and load connected to the No
can you make an wire circit to blink 6 lights blink
Absolutely =)
Oyvind
The ppage is headed “Blinking LED Circuit with Schematics and Explanation”, but there doesn’t seem to be any schematics. just the explanation and one photo.
There are schematics too. Try reloading the page.
Oyvind
Thank you!
I used the astable multivibrator to make a strand of regular fairy lights into twinkly fairy lights, for a friend’s wedding. (three sets of pairs, alternating at different speeds, all jumbled together, make a pretty good pseudo-random twinkle.)
Very cool!
c=2000uf, R3=390ohm.Could u tell me how you choose the values.
Ohm’s law is how he wound up with those values. What you need to do is pick your power supply voltage, ie:9volts, then you calculate your load current= total of all your loads, as in the loads of leds probally have around 3mA each, so you add 3mA+3mA=6mA, you then convert mA to amps 1000mA=1Amp, in this case 6mA/1000= .006 mA You now have your Volts, and your ( I )Current, so Ohm’s law states V/I = Resistance(Ohms), 9volts/.006mA=1500ohm. Study Ohm’s law, it will help out alot and save your life too!!!!!
Typo error: 6 mA can’t also be .006 mA.
Don’t confuse the beginners. 6mA=0.006 Amps. B-)
A have a Samsung TV locked with Keyword. What do I do to unlock it.
Excellent reply and just what I needed. Desired a 4.5v power supply as I have a 4.5v battery compartment available. TY
Im trying to do a similar project, but utilizing 3 LED’s in sequence instead of two. Any ideas on how that could be accomplished utilizing a similar circuit?
How to you want the LEDs to blink? All three ON and OFF at the same time? Only one ON at any one time?
Best,
Oyvind
this is very unclear and poorly done
Perhaps you are just a poor student.
Please give me a introduction of a blinking leD’s without arduino. Plsss..
There’s no use of Arduino in this article. So I’m not sure what you mean.
Best,
Oyvind
Can I get an inverter circuit
Can you recommand me an ebook can be helpful to gain a thorough knoweldge of making electronic circuits?
Hey, I would of course recommend my own book =)
You can find it here:
https://www.build-electronic-circuits.com/products/ebook-2nd-edition
Best,
Oyvind
Thank you for helping me…and the java applet that you’ve mentioned earlier in blinking led lights is a great illustration…keep it up…
Thanks for article. Can you please explain about battery & how to power up circuit ?
Thanks for article. Can you please explain battery & how to power up circuit safely ?
For the circuits in this article you don’t have to worry about safety. They all use very low power.
Best,
Oyvind
These comments seem to come mainly from “experts” who wish to glorify themselves at the expense of the site’s author.
First, one wonders why an expert would be looking at a page for such a (presumably) simple circuit, given their expert status.
Those seeking the “explanation” obviously missed the very obvious link to the more technical information,.
Can you design me a blinking LED death ray? You are the king of blinking LEDs after all!
—Guys the author of the site is trying to introduce you to some basic electrical/electronic concepts using circuits as examples to try and learn from. He’s not offering you a fish, he’s trying to teach you to fish.
Poorly Done, etc etc etc….
— How long did you spend on your your website, stooping from your “expert” throne into the —gutter with the rest of us, just to “Help a newb learn something” ???
—Oh, and please Please PLEASE provide the links
You might consider the questions from experts as a sort of pier review process. Weather they are self aggrandizing or not is in the mind of the reader. Our teacher is only human, and a little polite help, I would hope, would be welcomed. Some times we over look that which is obvious to us, but murky to the beginner.
Peer
Thank you for publishing this online for all to use. Can I place two additional LEDs in parallel (one additional for each side of the circuit so that I end up with alternating pairs) without having to modify any part of the circuit or increase the input power? Thanks.
Yes, you can. They might be a bit dim though. In that case, change the two 470 Ohm resistors to two 220 Ohm resistors.
Best,
Oyvind
what value should the capacitors be
Try with 10µF
Best,
Oyvind
Thank you sir.
It helped a lot.
It helped me IN my physics project.
:-)
Can I ask? cause I also need this circuit understand well. Its also our physics project :(
Can I see a Video making the Blinking an LED Using Relays? This is very useful in our thesis. But Iam not good in electronics. I will be very thankful sir if you help me :( I just need this for me to pass our subjects, and also to help my classmates/group mate. Iam hoping for you reply sir.
Hey Rhemar,
I don’t have that at the moment.
Best,
Oyvind
Can I ask for the materials to be used in making the Blinking an LED Using Relays
I’m updating the article with a better schematic and component values now.
Best,
Oyvind
thank you.
but i have a problems on how to evaluate the value of resistor ,capacitor and inductor
( how to analysis the circuit)
Hi Oyvind
Please check the arrow direction on the 2-nd example with relay and capacitor. It seems to be pointing wrong contact according to the text. ;)
Thank you,
Alex M.
Thanks for your comment!
I mixed ON and OFF there. Fixed it now. Was that what you meant?
Best,
Oyvind
I have always been curious about how blinking lights work, so reading your article and learning how a relay coil uses an electromagnet to route power to a light on and off making it blink was really cool! My dad loves electricity so he is always talking about things like this, but I have never understood what was happening. Maybe I just need to buy a relay and try to figure out how to work with it.
Hey Luke,
Great to hear you enjoyed the article. And yes – you should buy a relay and test it.
Here’s another article on the relay:
https://www.build-electronic-circuits.com/how-a-relay-works/
Here’e how to build an electromagnet:
https://www.build-electronic-circuits.com/build-an-electromagnet-in-5-minutes/
Best,
Oyvind
Hi, just wondered if you know how them flashing LED bollards work on the motorway road works. The ones I refer to are the ones that flash in a sequence without actually being connected to each other. You see them where the cones start to reduce two lanes down to one.
I’m not familiar with them, but if there is no cable between them, there’s probably a wireless signal that keeps them in sync.
Best,
Oyvind
It’s probably an illusion that they are connected some how. The lights blink at such a similar rate, that they just fall into sync from time to time. I have to say, dumb as it is, I like it when I see that happen. After all my years in electronics, blinking lights still make me smile. B-]
…and just by replacing the timing resistor with 2 diodes and a pot(entiometer) you can make a dimmer or speed controller from the inverter circuit above.
Very important notice, I have small equation, who is outlet in inverter 1or 2, I think 2 that is right, thanks
Sorry, I don’t understand your question.
Best,
Oyvind
i ve been studying in ur webpage nd i ve learnt alot bt am an amature and a hobyist inq electronics want to leav my country to meet with you nd study well cos my country is resourceless……..what do you think sir
Hey Julius,
I don’t have any live courses at the moment. But I have online courses you can join here: http://ohmify.com/join/
I wish you the best!
Oyvind
Hi
How do i calculate my own value, what if i wanted to try other value than 9 volts. How do i calculated value for each project, ex. Charged capacitor, resistor etc.
Is it hard ? Can you show me step by step ?
Why do you need to use charged capacitors , why not normal one , what is the difference ?
Thank you so much
Adele
Why does adding of the capacitor in the last project makes the led blink slower ?
I can ‘t think of it.
Um… I can ‘t quite imagine what happened in the last project is it 1 run vice versa with 2 and 16 run vice versa with 8. And current from battery run to 16 and goes 3 ways 2,1,8 the one that go to led have the same state as the capacitor. If there are high current running in led ways, there are also high current running to capacitor and the capacitor are charging and when the capacitor is charging it lets the led light ( just like in project with transistor ) and when it’s fully charged then the led went off…. Then I can’ t go on what happened . Is it correct ?
And another question.
The one with transistor, why R2 and R3 have to be more than R1 and R4
If I was setting values how many times does R1 and R4 have to be more than R 2 and 3. How do I calculated this?
Thank you so much
Adele
Love the inverter blink circuit!
What values need to be changed to use it with 12 volts dc? I have a 12v LED switch I want to blink.
What inverter IC do you recommend using at 12v?
Thanks for having the page…
Check out the HEF40106, it’s available in a version that accepts up to 15V supply voltage.
Best,
Oyvind
Oyvind,
Hello,
I am in serious need of a circuit that blinks an LED once every 15-20 seconds. It has to run on 12volt DC. I need it to not be too high a current draw (if possible) so as to not run down the vehicle’s battery. Car stays dormant for 2 weeks at a time. I do have a car alarm BUT it does not have a blinking light on the dash. I need to discourage would be thieves.
Thank you greatly.
PS. I build and restore hot rods and muscle cars.
Am Kris… Thanks i have tried one with a relay bt its noisey. Some time 2002 i had a casset with a sound level lighting led. The louder the music the brighter the led would glow… How can i make this a gain please help me out. In my new projects av tried lighting using 2 3 and 4 switches agaist one light. Am Kris from Uganda.
Please explain its working,application, advantage and disadvantages
Inthe first circuit picture you said the light blinks so fast you can’t see it. How fast does it blink? How fast can you make a light blink, and how do you accomplish metering it’s blink speed?
It blinks as fast as it can. It’s a mechanical process that needs to take place and this will happen as fast as it’s possible. How fast depends on the relay, I’ve never measured that.
Can germanium transistor also make a led blink?
I need the answer for my project. Anyone..please🙏
Hi,
I am a newb to electronics. In these circuits you are using standard LED’s. What if I am using a flashing LED?
I am building a model car for my daughter and want to make the turn signals blink. I have flat top 5mm LED’s that I am connecting fiber optic filament to bringing light to the different flashers. I am trying to make the circuit as small as possible (trying to fit it in the trunk). I’m figuring that I need a battery, resistor and a on-off-on micro switch (left and right lights) but want to make sure I’m not missing anything.
If you have LEDs that are flashing “out-of-the-box”, that means they have the falshing-circuitry built in. In that case you only need what the LED requires which I am guessing is only the correct voltage. And a switch to turn it on and off, yes.
Can you explain why in example 2 the capacitor is in parallel with the relay? It seems to me that it would work in series with the relay, and I can’t figure out how it works when it’s in parallel.
If the capacitor were placed in front of the relay I imagine that it would continue to feed current into the relay for a short time after the gate to the LED has opened, thereby keeping the gate open a little bit longer.
But in parallel I can’t see what purpose the capacitor serves. It looks to me like it just sends stored current back to the battery and doesn’t do anything to keep the relay on. Can you clarify?
Never mind, I think I misunderstood how and in what direction capacitors release their charge.
Hi, had a similar thought, if the capacitor is in parallel then why doesn’t the coil starts to work immediately? In the explenation you mention “After a moment, the relay coil pulls the relay into the other position.”
Hey Bart,
At first when the capacitor is “empty”, the capacitor will have 0 V across its terminals. Since they are in parallel, the coil will have the same voltage across its terminal and thereby not start to work
As the capacitor charges, the voltage increases and after a while the voltage is large enough to put the coil to work.
Best,
Oyvind
Hi,
In “Blinking an LED Using Relays” circuit what is the rule of the resistor R1?
Thanks
Hi, that ‘s to control the current through the LED. More info here: https://www.build-electronic-circuits.com/current-limiting-resistor/
Could you explain how I calculate the voltage drop at pin 7 and pin 3. Thank you. Your assistance would be greatly appreciated
I Read How To Blink An LED With An Inverter on your website.
Sir, i have a question ? Can this circuit works with proper connection with inverter made using transistor (not using inverter ic).
Any can Also check on http://www.circuitspedia.com/category/led-chaser-flasher-with-4017/
In example 2, what are the values/Nos of Q1 and Q2? In example 3, what is the value /No of U1? Thank you.
Hi,
Can I pay somebody to create one of those? :)
I’m in Canada (Quebec), but I don’t mind paying for shipping to get the item
I need to flash in that way : 2 sec on and 2 sec off
I purchased controller with knob to adjust speed, but I can’t get that slow 2/2 pace
That would control a big maximum of 10 amp on a 120v circuit.
My email is [email protected]
Hey, you can find people on upwork.com to these kinds of jobs. Good luck!
Oyvind
What is the purpose of residence in transistor circuit
R1 and R4 control the current through each LED, and therefore control the brightness (lower resistance = brighter LED.
R2 and R3 control the current that charges the capacitors. The more current there is (therefore, the less resistance), the faster the capacitors will charge and discharge, and the faster the LEDs will flash.
4 years late, but oh well, perhaps this will benefit another person wandering through the comments.
I have made a blinking led with inverter but the blink speed is too low and varies continuously. How to increase the blink speed?
Lower values for the capacitor and/or resistor will increase the speed.
Best,
Oyvind
I need a 555 timer circuit that, when power is applied, will turn on an led for five minutes and then start blinking the led continuously at 1 second intervals. I was wondering if this can be done using a single 555 timer? A transistor could be used if needed.
Thanks for your response.
Not that I know of. But you could use a 556 timer instead which has two 555 timers inside: Use one for having the LED on for five minutes and the other for blinking the led after
what is the results of this The experience?
In the second method, the one that uses transistors, which transistors should I use? Do the leds blink at once or not? And if I want to change the blinking frequency, what should I do?
Thanks in advance 😁
The transistors can be any general purpose NPN transistor. A few choices are BC546, BC547, BC548, 2N2222, 2N3904
Best,
Oyvind
pls
How do I altenately switch on three leds of which only one is on at any point in time without microcontrollers
You need something with 3 or more states. You can for example modify the following circuit:
https://www.build-electronic-circuits.com/knight-rider-light-bar-circuit/
I have tried with that second method which uses transitors but i found the leds are very very dim and not blinking. Should i increase input voltage from 9v to 12v or what should i do?
Hi Joel,
Increasing the voltage won’t help. It might even damage the LED.
If the LEDs are both lit, but dim, there’s a chance it’s blinking so fast that you can’t see it. Try increasing the value of R2 and R3 – or C1 and C2.
Increase in steps of 10x.
Ex: if you are using 10µF for C1 and C2, try using 100 µF.
Or if you want to increase R2 and R3: If you are using 47k now, try 470k.
Best,
Oyvind
I have a question. With the “blinking two LEDs with transistor”, is it possible to only get one LED flash instead of two, using the same components and simply ‘cutting’ the circuit in ‘half’ so that there are only 1 of each component (to only light up one LED). Thank you
You can’t cut the circuit in half, no. But you can, of course, remove one of the LEDs.
Please explain why the relay does not have magnetic field to pull the switch as it is connected to the plus side and minus side of the battery directly. The capacitor is also connected across the relay coil, plus and minus sides. So how does the capacitor cause delay since the coil is also connected directly to the battery supply???
It does get a magnetic field to begin with, and that pull disconnects the battery from the coil so that it should lose the magnetic field. But since the capacitor is connected across the coil, the capacitor keeps the coil magnetized for a bit more. Finally, the capacitor is discharged and the magnet stops pulling the pin upwards.
Hi Gents,
I come as a person that ignores even the basic tenets
I would like to know the feasibility to make a small circuit with 9 low power LED’s, and be able to run for 6 to 9 months blinking
It is for a display a client asked me to do and I look for good advise
Looking forward to your comments
Thank you in advance for your time,
Mario
Yes, that’s possible when you have no constraints when it comes to battery. But your client probably have some constraints, like weight or size or type of battery. And maybe a minimum brightness of the LED.
Do say a clear yes or no: figure out the mAh rating of the battery you will be using, and the voltage + current needed for the desired brightness of the LED.
Oyvind
Thank you kindly Oyvind.
There are no constraints, low power LEDs are a given and the client understands.
Commissioned a few samples in China to get a feel for it, maybe not the smartest way but the most ludic.
Cheers,
Mario
I would say that’s a great way to do it! Hook up your circuit with a battery and see how many days it lasts. Then you’ll have a base from which you can improve.
I’m looking a buying a “blinking LED” which runs off 5 volts and was considering a small 6v camera battery as I need to fit everything into a very small container. How would I wire this up and also get the LED to only blink every say 3-4 seconds?
Probably you won’t be able to change the blinking frequency of a pre-made blinking LED. And it’s hard to say how to power it with 6V without knowing the internal circuitry. If you’re lucky you can power it with 6V with no change. Check its datasheet for max input voltage.
Thanks, Oyvind!
I have no relays at home but built my blinking LED with a 555 Timer IC. I used an RGB led so my blinker can be red, green, blue, or any other color! Now i’m building another circuit with the 555 Timer!
Very cool idea!
Hi oyvind
In your led blinking diagram circuit. Please explain How did you calculate the following component value for 9DC volt
1. R1 value
2. R2 value
3. C1 value
Thank you
Hi Sangpo, you didn’t specify which circuit. But you can see how long it takes for the capacitor to about 63% by multiplying the capacitor value with the resistor value. From that calculation you can get an estimate of the blinking speed with given R and C values.
Sir, Please refer the circuit name”
Blinking an LED using relays” , the link to circuit is given below.
https://www.build-electronic-circuits.com/blinking-led-circuit/
So please kindly explain how you got the value of these components
1. R1 330 ohms
2.R2 100 ohms
3.C1 1000 micro farad
Thank you
R1 sets the current (and thereby the brightness) of the LED. Learn how to calculate it here: https://www.build-electronic-circuits.com/current-limiting-resistor/
You can see how long it takes for the capacitor to charge to about 63% of the applied voltage by multiplying the capacitor value C1 with the resistor value R2. And the time it takes to discharge by multiplying C1 with the coil resistance of the relay.
From those calculations, you can get an estimate of how long it takes before the relay turns on and off.
Also note that R2 must be much lower than the resistance of the relay coil. Otherwise, too much voltage will drop across R2.
Thank you sir. Now I understood how to determine the value of R1 330 ohms which is required for LED diode.
But than I m still confuse
With this
“You can see how long it takes for the capacitor to charge to about 63% of the applied voltage by multiplying the capacitor value C1 with the resistor value R2.”
Here the question is
How can I multiply value C1 with value R2. Without first knowing calculation of value of C1 and R2.?
Please throw light how you got C1 1000 mircro farad and R2 100 ohms
Thank you.
Sir, you have yet response my query.
Sir, please response my query of April 16 time 5 pm
I really want to know it Sir
Thank you
I’ve updated my last comment a bit as I forgot about the coil reistance.
Anyway, if you’re looking for a complete formula, I don’t have that. But it could absolutely be created if by taking into account the coil resistance of the relay and the voltage at which it pulls the switch.
Ex: I know that if R2 is too big, the relay will never turn on. I could take the resistance of the relay coil and the threshold voltage at which the coil pulls the switch and put those into the voltage divider formula to find the maximum value for R2.
So I choose an R2 value a bit lower than the maximum.
Next, I can decide on how long I want the relay to stay on. Let say 1 second.
As I mentioned, you can find time by multiplying capacitance with resistance: t = RC
Or you can turn that around to find capacitance from resistance and time: C = t/R
To get the relay to stay on for one second just divide 1 second by the amount of resistance in the relay coil.
Let’s say it’s 1k: C = 1 / 1000 = 0.001
That’s 1000 µF.
And the time it takes for the relay to turn on will be given by multiplying your R2 value with 1000 µF.
Note that these times won’t be exact, but a good starting point.
Hello,
Thanks for the article.
Could you please show the schematic for the relay LED flasher if you use a DS2Y-S-DC5V relay ?
Thanks,
Sam
hello,
could you please show the schematic for 3 times blinking of led after that turn off.
thanks
Akash
You have been SO patient with SO many questions. I have one. How can you control the ON duration of the LED, not just the OFF duration? I’m not asking for a solution, but a general direction. A modification of one of the above techniques? Does it require a microcontroller with a timer?
You would need two different resistors, one for charging and one for discharging. To separate them you’d need a diode for each resistor. If you modify the last circuit (blinking light using an inverter), you’d get something like this (the 4093 would be the inverter):
https://www.allaboutcircuits.com/uploads/articles/Schmitt_trigger_oscillator10.jpg
in the relay circuit setup, how do I like solve for the transient response or normal response of the circuit with the blinks?
I am at a loss to understand when the capacitor of inverter circuit is charged. Moreover the battery seems to be shorted for me. Please help!
I’ve created a free email course that explains how that circuit works: https://www.build-electronic-circuits.com/free-email-course/
Hello, I am not having luck in getting the LED to blink repeatedly, which as I understand is the purpose of this action ity. I am following the diagram listed in your book, Electronics for Kids. The led blinks once and turn off. Any advice? Thank you.
What’s the model number of your relay?
Thanks for all this great info. Unfortunately, I’m at a complete loss for how to connect the relay into the circuit. I’ve purchased the DS2Y-S-DC5V relay unit you suggested above and cannot for the life of me make it do anything interesting. Would you be willing to post a photo of the completed circuit with the relay unit that you have suggested and showing which pins on the relay to attach? Thanks!!
Hi Brad,
I’ve added a diagram now, just above the headline “Blinking Two LEDs Using Transistors”.
Best,
Oyvind
Hello.
Can you make a variant of the inverter circuit using a LDR?
Depending on the resistance value of the LDR the time of the blink changes.
Thanks!!
Hi, yes you can!
So, I feel like an idiot, but am stumped at the moment. I built the first circuit (the one with the relay) using all the same capacitor and resistor values, and this relay HK19F-8P-5V https://www.amazon.com/dp/B0874MC6D3?ref=ppx_yo2ov_dt_b_product_details&th=1
Frist time using relays, so entirely possible that I chose poorly.
Anyways, wiring it up exactly as shown appears to be keeping the relay closed (charging the capacitor) and the LED never goes off. Now, if I run a jumper from my VCC (9v) to pin 1, the relay flips, and the LED glows.
But then the weird part, back to the original circuit, if I pull the capacitor, I get a buzzing noise and the LED at half power, my guess is the relay is opening and closing really fast. If I hook up a voltmeter over the coil connections, I’m getting about 1.2V drop.
So, did I make the wrong relay choice for the circuit and the capacitor/resistor combo isn’t passing some value that I don’t know how to read from the specs for the relay, or is it something else funky. Bad relay? Misred schematic?
Thanks in advance for any help.
After spending a ton of time on this, and even buying some circuit simulator software, I figured out the problem: half the relays I got (3 of 6) failed in the circuit, the other three worked perfectly. Still not 100% sure what was going on, but experimentally I was seeing contact resistances in the 200 Ohm range (causing a huge voltage drop which meant the could never energized). Cheap relays are cheap for a reason I guess.
Glad you figured it out, Larry!
Just getting started in electronics…I built the version with 4 resistors and two capacitors and it worked as advertised. Nice clear instructions and helpful explanations. I actually understood most of it. Thanks!
It would probably help to label the relay’s contacts as DPDT in the schematic as you’re using it on the breadboard and linking it as well
I guess it doesn’t make much sense to add an unused pair of contacts though
Hi,
Can you help me out, i would need a schema/circuit for a single led blinking, around the same frequency as a turn signal on a car would blink. Its a 16v system. Would appreciate it, Daniel
Thank you very much! Based on some of the comments I think that some people need to remember that you are giving them free instruction and be gracious. I think that your explanations are well thought out and appropriate for the intended audience. More importantly, you are inspiring those with your passion. Keep it up!
I’ve now built my second circuit. My first was the blinking LED using an inverter. My second was using a relay. I noticed that with the relay you actually hear a noise with each blink and I assume it’s the mechanical switch from the relay going back and forth as the magnetic field increases/decreases causing the switch to be turned on and off?
Thanks, again!
Hey Jim, thanks!
And the noise you hear is the mechanical switch going back and forth, yes.
I built the circuit with the transistors. I had an idea to build a haunted bookcase. One shelf has a painting of a cornfield. Behind it is a LEGO rig supporting eight pairs of LEDs. I built four courses of the circuit driving two pairs of LEDs each. A nine-volt battery powers everything.
I forgot to mention that the LEDs blink like sinister eyes looking out from the cornfield. I ran out of the largest resistor called out in the circuit and substituted higher ohmages. This randomizes the blink rate! Line losses in the jumpers mean that the two pair of lights on one astable multi-vibrator don’t stay on and off for the same intervals either.
Nice work!
Hi, I have recently used your excellent guide to construct a bleeping alarm buzzer circuit using the relay method, instead of flashing an led, I used the relay contacts to operate a small DC buzzer controlled by a remote push switch. My disabled wife can now easily call for assistance from another room. Many many thanks and please ignore the detractors out there! Rob.
Used the relay version to construct a bleeping alarm call circuit. I used the relay contacts to operate a small electronic buzzer controlled by a remote push switch in place of the led. My disabled wife can now call for assistance from another room. Absolutely brilliant , many thanks.
Great to hear!
Howdy. Everything works until I add the 1000 uf capacitor. Once I remove it , the relay buzzes repeatedly…The capacitor works – I tested it with a little led and resistor…Any ideas on how to trouble shoot this or where I may have gone wrong?
In Popular Electronics in July of 1963, there was a construction project called “Nonsense Box.” It made 8 neon bulbs, each with its own parallel-resistor-and- capacitor in series with it, all in parallel with a resistor and 90V battery. The lights blinked pretty much at random. (I know it worked because I built one. Yeah, I’m older than dirt. Anyway, my girlfriend at the time was enchanted.) I’m wondering how to adapt such a design to LEDs and low voltage.
Interesting circuit! But I have no idea how to make that behavior happen with LEDs. If you simply replace the neon lights with leds and adjust the resistance values a bit, you’ll just get 8 lights lighting up at the same time. Maybe someone else has an idea?
I’ve uploaded the image for easy reference here: https://www.build-electronic-circuits.com/wp-content/uploads/2024/01/Nonsensebox-circuit-only.jpeg
I’m attempting to build the circuit from you book “Electronics for Kids”, and I purchased the kit from Jameco for my 8 year old son, which he loves. I am unable to get this to work for the life of me! When replacing the jumper cable with a resistor, the LED fails to light up and the “clicking” sound from the relay diminishes in intensity but does not slow down. I looked up the data sheet for the relay, and everything works as described in the book until the resistors are connected. Once the resistors are in place, the speed at which the relay clicks increases, but the sound intensity decreases and the LED no longer flashes, but stays dark. PLEASE HELP US
what is spec for relay ?