 This is my first of five posts in this microcontroller tutorial series. Throughout this tutorial, I will be building a microcontroller circuit while documenting the process. By following what I do, you can make your own at home.
My goal is to make a circuit that is as simple as possible, and which requires no external programmers or debuggers. You should be able to just plug it into a USB port on your computer and program it.
I have not planned this out in any way. I am just going to build it, and write about the process. Hopefully we’ll end up with a usable circuit.
In this first part of the microcontroller tutorial, I’ll start from scratch. I want to explain what a microcontroller is, in very simple terms. I want to get everyone on board before we dive into making the circuit.
What Is A Microcontroller?
You can think of a microcontroller like a tiny computer. You can connect things, like a small display, some buttons, a motor and some sensors. And you can put programs onto it and run them.
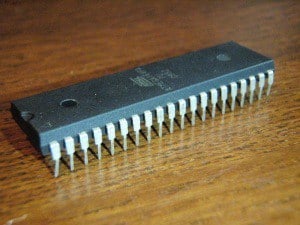
A microcontroller is an integrated circuit, and it can look like this:
Download the Microcontroller Tutorial
A step-by-step guide on how to make a microcontroller board you can build at home using standard hobby tools.
But it can also have many other shapes and forms.
What Can You Do With A Microcontroller?
Oh, where do I begin?
There are so many things you can do with a microcontroller.
You could build a robot. Or an MP3-player. Or a cellphone. Or a door-lock that unlocks your door automatically when you enter a code on your smart phone.
The possibilities are endless!
Let’s say you want to build a robot. You can connect an infrared sensor to use as vision for the robot. And you can connect a motor with some wheels to make it move.
Now, all you have to do is to make a program that reads from the infrared sensor and controls the motor. In your code, you can make sure the robot stops if it sees something in front of it, and make it turn to either left or right before continuing.
When you know how to build microcontroller circuits, there are almost no limits to what you can do! And by following this microcontroller tutorial, you will learn to use microcontrollers in your own projects =)
A Closer Look At A Microcontroller
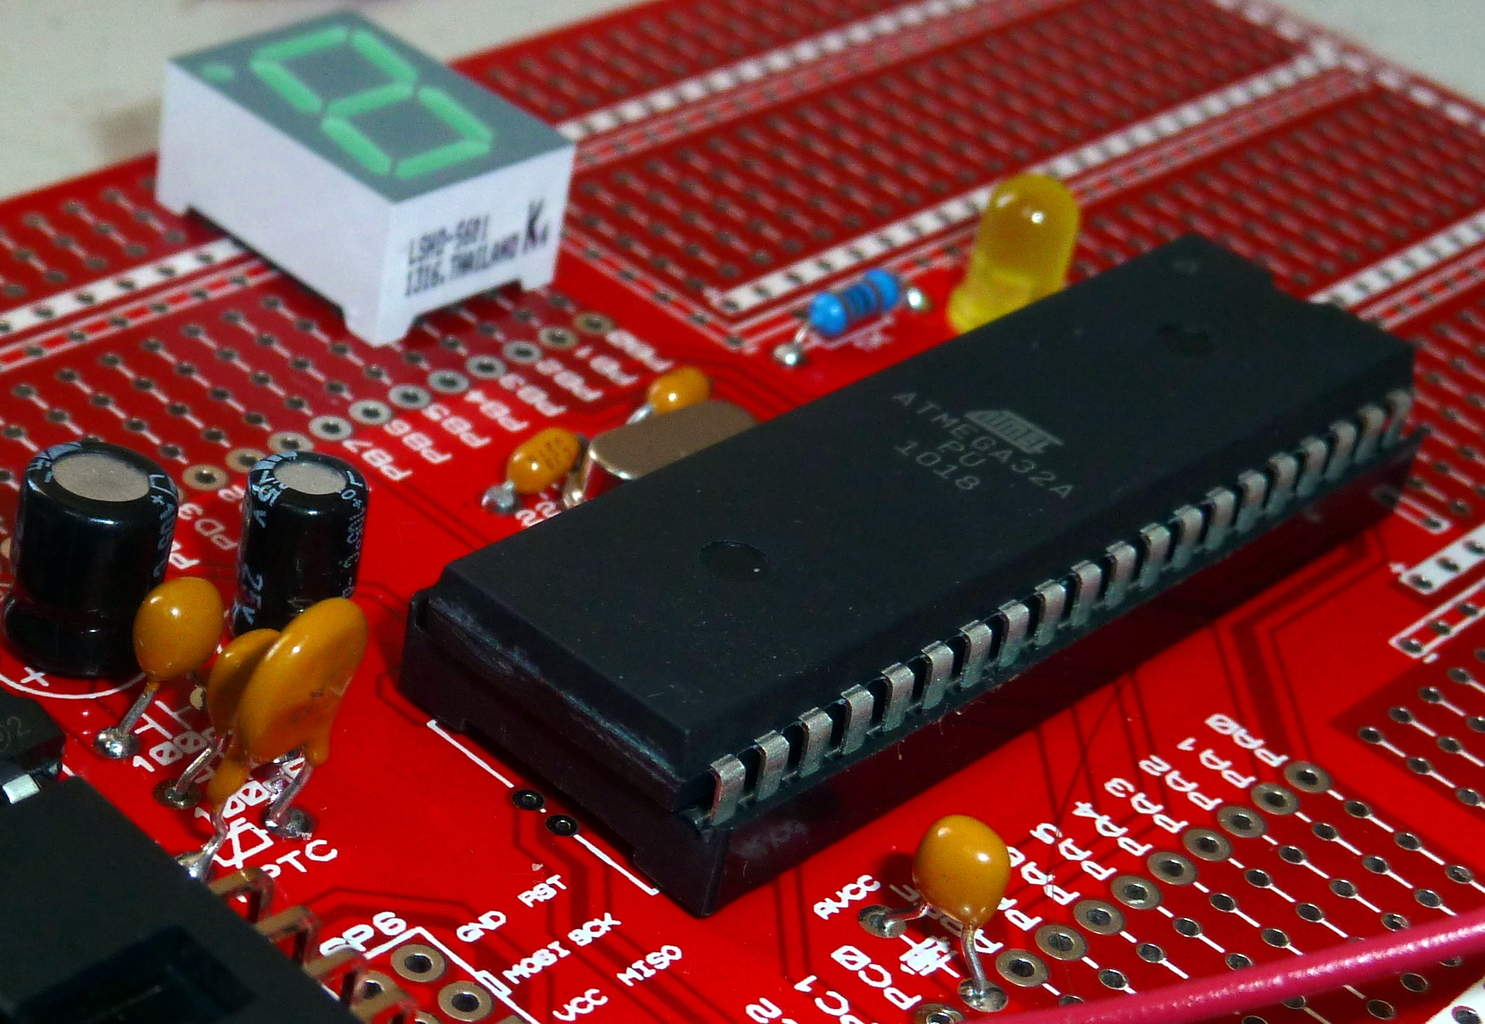
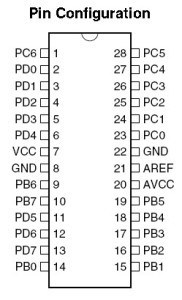 A microcontroller has several pins. Most of these pins are so-called input and output pins. And by using these pins, the microcontroller can interact with the outside world.
The microcontroller doesn’t do anything by itself. You need to tell it what to do, by making a program that you load into it to it. This is often called programming the microcontroller.
From the program you write, you can control the input and output pins.
So – by connecting something, such as a Light-Emitting Diode (LED) to an output pin, you will be able to switch the light on and off from your program.
An input pin could be used to check if a button connected to it has been pushed. Or to read the temperature from a temperature sensor.
In your program, you will be able to make decisions based on the input. So you can make a program that will start to blink a light if the temperature goes above or under a certain level. Put this into your beer-brewing room and you will get a visual alarm if the temperature for brewing is not right.
Programming a Microcontroller
Programming a microcontroller can seem a bit tricky because there are many confusing choices to make. I remember how I felt in the beginning. With all the available compilers, IDE’s, programmers and programming methods – no wonder you get confused!
So, let’s break it down.
These are the three steps necessary to program a microcontroller:
1. Write code
2. Compile your code to machine code
3. Upload the machine code to your microcontroller
What exactly to do at each step varies from microcontroller to microcontroller. But don’t worry – I’ll be guiding you through the exact steps needed when we get there.
Next Up In The Microcontroller Tutorial
It’s time to find a microcontroller and get to work. Finding a microcontroller isn’t necessarily as easy as you would like it to be. There are probably 58 billion different ones. Ok, maybe a little less. But a lot.
But I have some tips up my sleeve that will make it easier. But more on that in the next part of the microcontroller tutorial.
Throughout the tutorial, I will show you the steps you need to take to build your very own microcontroller circuit. You will then be able to use this circuit to build a blinking lamp, a robot, or some other idea of your own.
Continue to part 2 of the microcontroller tutorial >>
More Microcontrollers Tutorials
Download the Microcontroller Tutorial
A step-by-step guide on how to make a microcontroller board you can build at home using standard hobby tools.
Thank you for the valuable information.
Glad you like it!
Oyvind
Looking forward for the next tutorial. Thanks.
No problem =)
It should be up within a few days.
Oyvind
thanks for the information. i would look up for the next tutorial.
No problemo :)
Oyvind
Thank You … Its realy useful information for me !! Looking forward for ur next Tutorial..
Glad you enjoyed it!
Oyvind
Thanks for this information on microcontroller. I look forward to the next tutorial.
Hi sir I want to connect u on fb so please write here your fb id then I send u freind request.plsssss
Thanx
SHOBHIT
http://facebook.com/BuildElectronicCircuits
Thank you so much for sharing this nice article with Us…. Please write about Programming of a PIC 18 microcontroller… or give me a reference link.
i would b very thankful
Here is a reference link of step by step PIC18 microcontroller programming. Hope you will learn something new from the post. :)
http://electricaltechnology.org/2014/10/programming-pic18-microcontroller.html
thaanks very good information
thanka alot
This is realy a helpful info,looking forward for next tutorial. Thanks
cool, a key to my final year project. a solution at last.
Its great. God bless you. Looking forward to the next.
You are awesome. I love the way that you explain the process in a way that I can understand. Please continue. I have a desire to want to learn this stuff, but I have a hard time understanding the literature out there. Thank you.
Gerald
Thanks for your encouraging words guys :)
I really appreciate it!
Oyvind
This is great!
I wish you were my college professor for Digital Circuits & Logic Design.
Haha, thanks!
Oyvind
Hi, Very happy to have come across you! My childhood happiness is back and forwarding it to my son…Hope to continue with you and have fun!
Great to hear =)
Oyvind
basic of microcontroller learning help pls
Try this one: https://www.build-electronic-circuits.com/microcontroller-basics
Cheers!
Oyvind
Great Work bro….Wanna be ur most Valuable student….am new to electronics …..i need u to multivate me….and guide me on so many things….i will be looking forward to ur reply
Hey Yunus,
Thanks for those nice words!
I’m launching an online course this week if you’re interested in becoming my student: https://www.build-electronic-circuits.com/build-your-own-electronic-gadgets-info/
Cheers!
Oyvind
Thank’s a lot for your valuable information about electronics
Thanks for the message, infact I’ve not been receiving your mail if not today, thanks for time.
Hey,
Some days I’m just too busy too write. But you’ll get one soon =)
Cheers!
Oyvind
Thanks for the e-mails, i still work full time, but i’m glad i can refer to them if i need to, i keep them all in a folder. Have a great New Year.
first of all i would like to thank you for such a nice explanation about microcontroller.
sir i love to learn about microcontroller and i want to make microcontroller based projects, i learn so much from your microcontroller tutorial, Now sir i want to learn programing of microcontroller avr from basic.
please help me i wil be very thankful to u.
faisal
Hi,
Maybe this can help: https://www.build-electronic-circuits.com/microcontroller-programming/
Best,
Oyvind
i always think about how does a circuit works with on its own. now i have a have clear overall idea because of you sir oyind thanks for the information provided above
Great! =)
Thank you so much admin…kindly contact me through my email address indicated.I find your tutorials very useful and simplified.
Sir, i really appreciate your works. God will continue to love you. I am a nigerian i love electronics so much. Just wanna show appreciation
Thanks! =)
This is amazing!! It makes me more interestes about circuits ang programming…
Great! =)
Thanks a lot for this tutorial.. I am learning electronics from your website.. This is the best teacher..
Great to hear! =)
I want to use my old smartphone with broken screen as microcontroller so how can I do it.
If it has a microcontroller, you need to find out what kind. Then get a programmer for it, and a compiler. Not an easy task.
Sir I want to learn all about electronics, I want to know how phone, computers, electronic gadgets are made. And then I want to make a machine which could think like us. Actually I want to make a human machine.
And I don’t know nothing about electronics, but I want to know.
Here’s an article with what you need to learn:
https://www.build-electronic-circuits.com/electronics-for-beginners/
You can also sign up for my online class to learn electronics at Ohmify (ohmify.com)
Hey,
I like the way you explain things here. I would like to know, which would be the best way of learning to create circuits ? For example, I would like to build the circuit for an RC Boat and it’s remote but I wanna avoid buying kits and plug and play modules. I wanna order the parts i need, design my own template of circuit board and send it to a Fab House and when I have everything, start to assemble and program. I would appreciate your help.
Best regards ;)
Here’s an article on what you need to learn:
https://www.build-electronic-circuits.com/electronics-for-beginners/
You can also sign up for my online class to learn electronics at Ohmify: https://ohmify.com
Best,
Oyvind
I need knowledge in programming in order to use a microcontroller. thanks, otherwise it is interesting.
Love this tutorial. I’ve ordered 5 boards from your files to be made and I’ve ordered the components. However, I need guidance on the clock. What component? and does one need to set the fuse bytes? Also, how does one go about selecting a clock source?
Thanks.
Hey Dave,
Great to hear! I used an 8 MHz crystal for my board. You need one with two pins that fits onto the board. I think it was an HC49 surface mount (SMD) package I used.
And as long as they haven’t changed any default settings of the chip since I wrote that tutorial, you shouldn’t need to change anything. It should show up as a USB device on your computer as long as you’ve soldered everything correctly.
Best,
Oyvind
Hello , thanks for that microcontroller course, please make it into a full kit with all parts and tutorials
can you mail me how to upload the program in microcontroller
Thanks for the tutorial.
But please how can I get the full tutorials on building microcontroller circuits from beginning to end.
Thank you soooo much!!! I can’t even begin to describe how grateful i am for your work and website. I’m 15 and just starting out with electronics and can’t believe this page has so much helpful information all in one place. What’s more, its free! you are a legend sir, thankyou.
I checked out your Youtube videos but i did’t get any videos related by making
circuit. Can you make videos in which you cover all things , I mean How can make
own circuit and How does it calculation ,
i tried to make many project but it was’t work, please make video about this
Good job. Keep going
The lecture was good. Please continue, Daniel
Thank you very much. The way you explain things are so understandable and I love it. You are awesome please keep on teaching us.