fbpx

Arduino Sound Sensor: Control an LED with Sound

In this tutorial, you’ll learn how to connect an Arduino sound sensor to control an LED with sound. By the end of this guide, you’ll have a working sound-activated LED! Parts List How To Connect the Arduino Sound Sensor In the schematic diagram below, you can see the complete connections for this project. Connect the

Arduino Speaker Tutorial: Play Melodies with Your Arduino

In this beginner-friendly tutorial, you’ll learn how to set up an Arduino Speaker circuit where you will play a melody from your Arduino. By the end, you’ll have a basic understanding of how to create Arduino projects that play melodies.

What You’ll Need:

Arduino Buzzer Tutorial: Play Melodies with Your Arduino

In this quickstart tutorial, you’ll learn how to control a passive buzzer using your Arduino UNO to play a simple melody. By the end, you’ll have a basic understanding of how to incorporate sound into your Arduino projects. Materials Needed Arduino Buzzer Schematic Diagram Refer to the schematic diagram provided to connect your passive buzzer

The Transistor as a Switch: A Practical Guide for Beginners

nMOS transistor as a switch

Using the transistor as a switch is a practical and useful skill to have. By setting up transistors in very simple circuits, you can easily control things like DC motors, lamps, buzzers, and much more. This is useful for beginners and experienced electronics enthusiasts alike. In this guide, you’ll learn the basics, the necessary components,

Arduino RGB LED Guide: Easy Setup and Code Examples

Arduino RGB LED on a breadboard

In this guide, you’ll learn how to control an RGB LED using the Arduino. An RGB (Red-Green-Blue) LED can produce a wide variety of colors by mixing different intensities of red, green, and blue light. You’ll learn to create a basic Arduino RGB LED circuit and cycle through some basic colors as an example.

Using the provided schematic and breadboard images, as well as the example code below, you should have everything you need to easily set up and control an RGB LED’s color output on your own.

Parts Needed

There are two types of RGB LEDs: Common Anode and Common Cathode. We’ll provide example schematics and code for both types below.

Arduino Thermistor Guide: Easy Circuit & Code Walkthrough

Arduino thermistor circuit

In this tutorial, we’ll guide you on how to set up a thermistor with Arduino to create a basic thermometer. The schematic, breadboard illustration, and example code provided will make it easy and straightforward to get your thermistor working.

Parts Needed

Step 1: Understand the Thermistor

Our thermistor has the following parameters:

Bipolar Junction Transistor – A Getting Started Guide for Beginners

The Bipolar Junction Transistor (BJT) is one of the two most used types of transistors. You can use it to create audio amplifiers, switch on/off DC lamps, motors, and much more.

In this tutorial aimed at beginners, you’ll learn the basics you need to start having fun and design your own transistor circuits.

Bipolar junction transistors on a circuit board

Diode Bridge: Four Diodes That Convert From AC to DC

Diode bridge symbol

The diode bridge rectifier is a simple circuit used to convert alternating current (AC) into direct current (DC). In this guide, you’ll learn how it works, what it’s used for, and how you can build your own.

diode bridge circuit

Even though you may not notice it, the diode bridge rectifier is everywhere. It’s used for transforming the AC voltage from your wall outlet into a DC voltage that your devices can use.

So when you charge your phone or laptop, or you turn on the TV, there’s often a diode bridge working its magic in the back.

Arduino Light Sensor – Circuit and Code Example

Arduino Light Sensor Circuit

This Arduino Light sensor circuit is a simple example that shows you how to connect light sensors such as photoresistors, photodiodes, and phototransistors, to an Arduino.

In this quickstart guide, you’ll learn how to connect a photoresistor to an Arduino board and read out the voltage. You’ll first use the Serial Monitor to learn about how the light sensor behaves, then you build a circuit that automatically turns on a light when it gets dark.

This is a great practice circuit when you’re learning Arduino. The code is straightforward and the light sensor connections are simple.

Parts Needed

* A photodiode or phototransistor will also work.

Arduino Button – Circuit and Code Example

Arduino button circuit on a breadboard

This Arduino button circuit is a simple example that shows you how to connect buttons to an Arduino.

In this quickstart guide, you’ll learn how to connect a button to an Arduino board and read a HIGH or LOW depending if the button has been pushed or not. You’ll use the Light-Emitting Diode (LED) that is included on the board to turn on and off with the button so that you can verify that your button press code is working properly.

This is a great practice circuit to build as you’re learning Arduino. The code is straightforward and the connections are simple.

Parts Needed

  • Arduino Uno
  • Breadboard (and some breadboard wires)
  • Resistor 10 kΩ (R1)
  • Resistor 470 Ω (R2)
  • Pushbutton or Switch
  • Wires

Arduino Button Circuit

To connect a button to an Arduino, you’ll need a pull-down or a pull-up resistor. This is to make sure that when the button is not pushed, it has a defined value. In this example, we’re using a pull-down resistor of 10 kΩ.

The Potentiometer: Pinout, Wiring, and How It Works

Inside a potentiometer

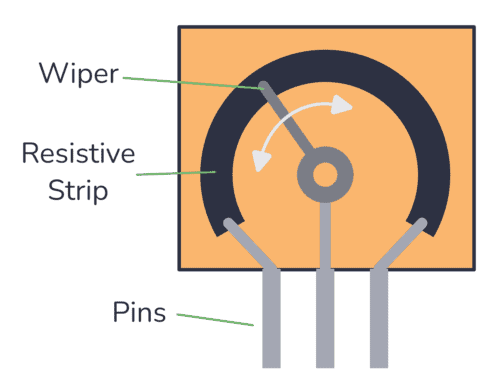
A potentiometer is an adjustable resistor with three pins. The fact that it has three pins instead of two was confusing to me when I was starting to learn electronics. But as soon as I saw the inside of it, it all made sense.

In this guide, I’ll show you what the potentiometer looks like on the inside, the different potentiometer types, and examples of how to wire it up for different circuits.

What Is A Potentiometer?

Potentiometers are adjustable resistors used in circuits for many things, such as to control the volume of an amplifier, control the brightness of a light, and much more.

It is like the resistor. But while the resistance value of a resistor stays the same, you can adjust the resistance value of a potentiometer.

Arduino Potentiometer – Circuit and Code Example

Arduino Potentiometer

This Arduino Potentiometer circuit is a simple example that shows you how analog inputs work, and how you can use the Serial Monitor to learn about what is going on inside the chip.

In this quickstart guide, you’ll learn how to connect a potentiometer to an Arduino board and read out the voltage. This is a great practice circuit when you’re learning Arduino. The code is straightforward and the potentiometer connections are simple.

Parts Needed

Arduino Potentiometer Circuit

To connect a potentiometer to an Arduino, connect the middle pin of the potentiometer to an analog input pin on the Arduino. Then connect the outer pins to 5V and GND.

What is Arduino and How Do I Get Started?

Arduino UNO board

Arduino is a microcontroller board that makes it really easy to program electronics. It’s an easy way to get started with microcontrollers that I highly recommend since it lets you jump right into the code and do stuff from the start.

You can use it both for building simple things like a blinking LED – and advanced stuff like building an internet-connected robot. With Arduino, it’s simple to build really cool electronics projects without learning a bunch of theory. And it’s fun!

It has several inputs and outputs that are controlled by simple commands that you write into a program on your computer.

Arduino UNO board

Open Collector Output – What Is It and How Do I Use It?

Open collector output

An open collector output is not a normal high/low output. Instead, these outputs are connected via a transistor. And the collector of the transistor is available at the pin. For example, if you have a NAND gate with an open-collector output, it will look like this: So when the output from the NAND gate is ‘1’,

Arduino Blink LED – Circuit and Code Example

Arduino blink LED on a breadboard

The Arduino blink LED circuit is a simple circuit that works great for starting to learn Arduino. Both the code and the connections are straightforward so that you can understand it with little to no background.

In this quickstart guide, you’ll learn how to connect an LED to an Arduino board and make it blink.

Parts Needed

Arduino Blink LED Circuit

To connect an LED to an Arduino, you need a resistor in series with the LED. This is to limit how much current the LED pulls out of the Arduino pin. The value isn’t crucial but should be between 220 Ω and 1000 Ω.