Arduino IR Transmitter Circuit

In this guide, you’ll learn how to set up an Arduino IR Transmitter circuit. It lets you control an IR (Infrared) LED and send any remote control code from your Arduino. This means you can use it to control your TV or anything else you feel like! The Circuit The circuit is pretty straightforward. Three

Arduino Rotary Encoder: Tutorial With Example

In this tutorial, you’ll learn how to interface an incremental rotary encoder with an Arduino to read the movement of the knob. This can be useful for creating user interfaces or reading mechanical positions in robotics and other applications. What You Will Need Schematic and Breadboard Setup Note that in this schematic I’m using a

Arduino Motor Guide: How to Drive a DC Motor

In this Arduino motor guide, you’ll learn how to drive and control the speed of a DC motor using an Arduino UNO and a TIP120 transistor. In this example, you’ll use a pushbutton to ramp up the motor speed and then slow it down, thanks to the power of Pulse Width Modulation (PWM). Materials Needed:

Arduino Servo Motor: Reference Code and Wiring Example

In this Arduino servo motor tutorial, you’ll learn how to control a servo motor using an Arduino UNO board and a potentiometer. As soon as you’ve got this example project up and running, you’ll have the skill of controlling servo motors from your Arduino. This can be the basis for more advanced robotics projects. Components

Arduino Hall Effect Sensor: How to Detect Magnetic Fields

In this guide, you’ll learn how to set up an Arduino Hall effect sensor, specifically the US1881, to detect magnetic fields. This can be useful for projects where you need to find the RPM of a motor or other movements in a machine. Parts Needed Schematic Diagram Connect the VDD pin of the US1881 Hall

Arduino Ultrasonic: Controlling an HC-SR04 with Arduino UNO

A popular Arduino Ultrasonic Sensor is the HC-SR04. It’s widely used for non-contact distance measurements and often used in robotics and automation projects. This guide will show you how to connect an HC-SR04 to an Arduino and write a simple program to measure distance. Requirements Connection Diagram Step-by-Step Guide Arduino Ultrasonic Example Code Copy and

Arduino Sound Sensor: Control an LED with Sound

In this tutorial, you’ll learn how to connect an Arduino sound sensor to control an LED with sound. By the end of this guide, you’ll have a working sound-activated LED! Parts List How To Connect the Arduino Sound Sensor In the schematic diagram below, you can see the complete connections for this project. Connect the

Arduino Speaker Tutorial: Play Melodies with Your Arduino

In this beginner-friendly tutorial, you’ll learn how to set up an Arduino Speaker circuit where you will play a melody from your Arduino. By the end, you’ll have a basic understanding of how to create Arduino projects that play melodies.

What You’ll Need:

Arduino Buzzer Tutorial: Play Melodies with Your Arduino

In this quickstart tutorial, you’ll learn how to control a passive buzzer using your Arduino UNO to play a simple melody. By the end, you’ll have a basic understanding of how to incorporate sound into your Arduino projects. Materials Needed Arduino Buzzer Schematic Diagram Refer to the schematic diagram provided to connect your passive buzzer

Arduino RGB LED Guide: Easy Setup and Code Examples

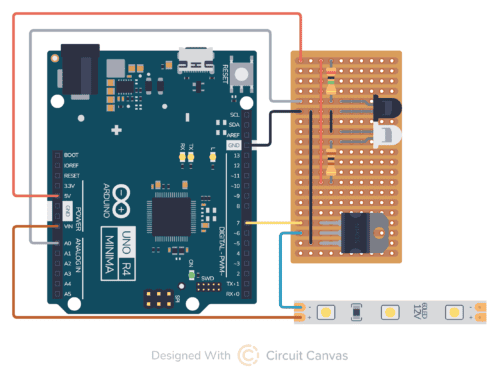
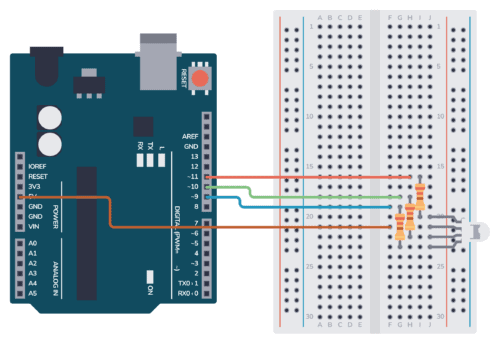
In this guide, you’ll learn how to control an RGB LED using the Arduino. An RGB (Red-Green-Blue) LED can produce a wide variety of colors by mixing different intensities of red, green, and blue light. You’ll learn to create a basic Arduino RGB LED circuit and cycle through some basic colors as an example.

Using the provided schematic and breadboard images, as well as the example code below, you should have everything you need to easily set up and control an RGB LED’s color output on your own.

Parts Needed

There are two types of RGB LEDs: Common Anode and Common Cathode. We’ll provide example schematics and code for both types below.

Arduino Thermistor Guide: Easy Circuit & Code Walkthrough

In this tutorial, we’ll guide you on how to set up a thermistor with Arduino to create a basic thermometer. The schematic, breadboard illustration, and example code provided will make it easy and straightforward to get your thermistor working.

Parts Needed

Step 1: Understand the Thermistor

Our thermistor has the following parameters:

Arduino Light Sensor – Circuit and Code Example

This Arduino Light sensor circuit is a simple example that shows you how to connect light sensors such as photoresistors, photodiodes, and phototransistors, to an Arduino.

In this quickstart guide, you’ll learn how to connect a photoresistor to an Arduino board and read out the voltage. You’ll first use the Serial Monitor to learn about how the light sensor behaves, then you build a circuit that automatically turns on a light when it gets dark.

This is a great practice circuit when you’re learning Arduino. The code is straightforward and the light sensor connections are simple.

Parts Needed

* A photodiode or phototransistor will also work.

Arduino Button – Circuit and Code Example

This Arduino button circuit is a simple example that shows you how to connect buttons to an Arduino.

In this quickstart guide, you’ll learn how to connect a button to an Arduino board and read a HIGH or LOW depending if the button has been pushed or not. You’ll use the Light-Emitting Diode (LED) that is included on the board to turn on and off with the button so that you can verify that your button press code is working properly.

This is a great practice circuit to build as you’re learning Arduino. The code is straightforward and the connections are simple.

Parts Needed

  • Arduino Uno
  • Breadboard (and some breadboard wires)
  • Resistor 10 kΩ
  • Pushbutton or Switch
  • Wires

Arduino Button Circuit

To connect a button to an Arduino, you’ll need a pull-down or a pull-up resistor. This is to make sure that when the button is not pushed, it has a defined value. In this example, we’re using a pull-down resistor of 10 kΩ.

Arduino Potentiometer – Circuit and Code Example

This Arduino Potentiometer circuit is a simple example that shows you how analog inputs work, and how you can use the Serial Monitor to learn about what is going on inside the chip.

In this quickstart guide, you’ll learn how to connect a potentiometer to an Arduino board and read out the voltage. This is a great practice circuit when you’re learning Arduino. The code is straightforward and the potentiometer connections are simple.

Parts Needed

Arduino Potentiometer Circuit

To connect a potentiometer to an Arduino, connect the middle pin of the potentiometer to an analog input pin on the Arduino. Then connect the outer pins to 5V and GND.

What is Arduino and How Do I Get Started?

Arduino is a microcontroller board that makes it really easy to program electronics. It’s an easy way to get started with microcontrollers that I highly recommend since it lets you jump right into the code and do stuff from the start.

You can use it both for building simple things like a blinking LED – and advanced stuff like building an internet-connected robot. With Arduino, it’s simple to build really cool electronics projects without learning a bunch of theory. And it’s fun!

It has several inputs and outputs that are controlled by simple commands that you write into a program on your computer.

Arduino UNO board