In this tutorial, you’ll learn how to create an Arduino PIR Sensor. PIR stands for Passive InfraRed. The PIR sensor is widely used in motion detection applications and this project will show you how to use it to control an LED. When the sensor detects motion, the LED will turn on and the event will be logged via the serial monitor.
The Circuit

Parts List:
- 1 × Arduino UNO
- 1 × PIR Motion Sensor
- 1 × Light-Emitting Diode (any color, typically red for indication)
- 1 × 220Ω Resistor for LED
- Breadboard and jumper wires
How It Works
The PIR sensor detects infrared light emitted by humans and animals. Commonly, it looks for changes in the detected infrared light, which means someone or something has moved within its detection field.
When motion is detected, the sensor outputs a HIGH signal. This signal can be read by the Arduino, which in turn, activates the LED.
How To Build the Arduino PIR Sensor Circuit
Set up the Arduino on your computer and connect the USB cable.
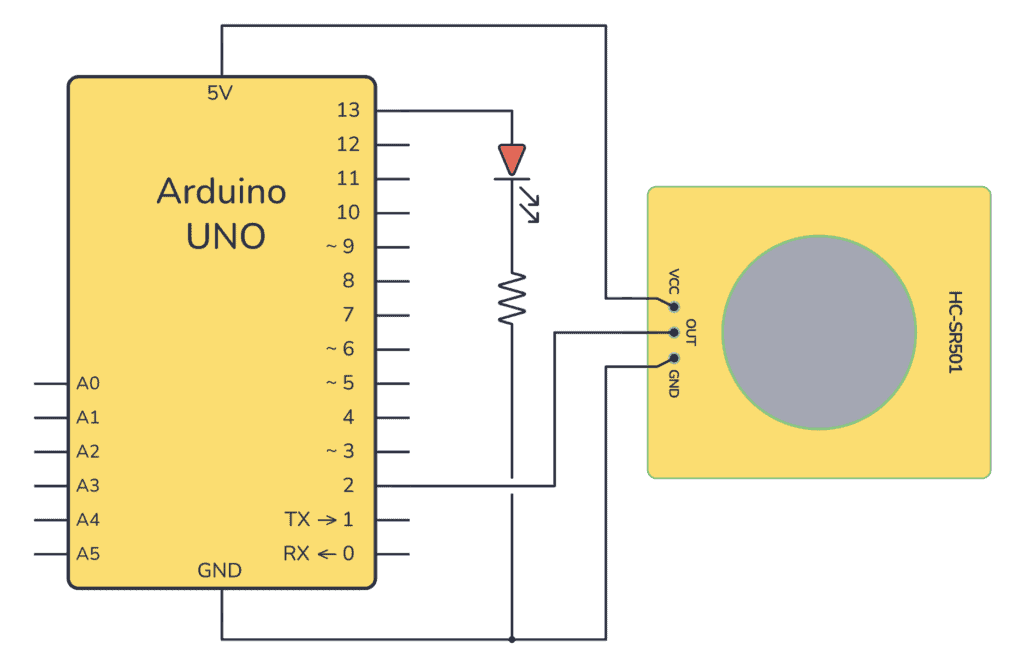
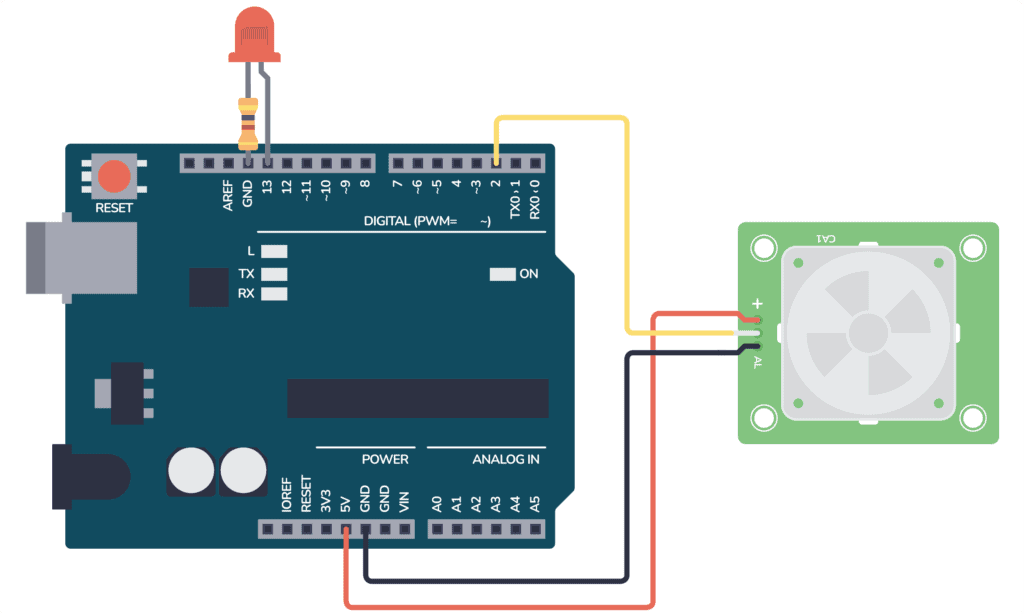
Take the PIR sensor and connect it to the Arduino’s 5V and GND for power. Connect the PIR sensor signal output to digital pin 2 on the Arduino.
Connect the LED’s anode (the longer leg) to digital pin 13 on the Arduino. Connect the cathode (the shorter leg) through a 220Ω resistor to GND.

Use the following code to program the Arduino. Open the Arduino IDE, copy and paste the code into a new sketch, and upload it to your Arduino board:
int ledPin = 13;
int sensorPin = 2;
int sensorState = LOW;
int sensorValue = 0;

void setup() {
  pinMode(ledPin, OUTPUT);
  pinMode(sensorPin, INPUT);
  Serial.begin(9600);
}

void loop(){
  sensorValue = digitalRead(sensorPin);
  if (sensorValue == HIGH) {
    digitalWrite(ledPin, HIGH);
    delay(100);

    if (sensorState == LOW) {
      Serial.println("Motion detected!");
      sensorState = HIGH;
    }
  }
  else {
      digitalWrite(ledPin, LOW);
      delay(200);

      if (sensorState == HIGH){
        Serial.println("Motion stopped!");
        sensorState = LOW;
    }
  }
}
Once you’ve uploaded the code, the PIR sensor will begin to monitor the area for motion. When a change is detected, the Arduino will turn on the LED and output a message to the serial monitor.

Basic Electronics for Arduino Makers
Learn the basics that every Arduino maker should know, and it'll open you up to a world of possibilities! Sign up for my circuit tips by email and I'll send you the eBook:
Troubleshooting Tips
- If the LED does not light up when motion is detected, check your connections and ensure the LED is properly oriented with the correct polarity.
- Make sure the PIR sensor is powered with 5V from the Arduino and correctly connected to the input pin.
- If the LED stays on or off, adjust the sensitivity and time-delay potentiometers on the PIR sensor module. It may take a few moments for the sensor to calibrate when first powered on.
- Verify that the correct pin numbers are used in the sketch according to your physical setup.
- Sometimes the environment causes the PIR sensor to trigger falsely. Stabilize the sensor and eliminate potential sources of false triggers such as heating vents or moving curtains.
More Arduino Tutorials

Basic Electronics for Arduino Makers
Learn the basics that every Arduino maker should know, and it'll open you up to a world of possibilities! Sign up for my circuit tips by email and I'll send you the eBook:
