In this tutorial, you will learn how to set up an infrared (IR) receiver with an Arduino UNO.
An IR receiver is a module that will help you decode signals from an IR remote control. In this tutorial, we’ve used the TSOP312, but many others will work. The Arduino will process these signals and print the received IR codes to the serial monitor.
You can use this to create your own custom Arduino remote control by combining it with an Arduino IR transmitter.
The Circuit
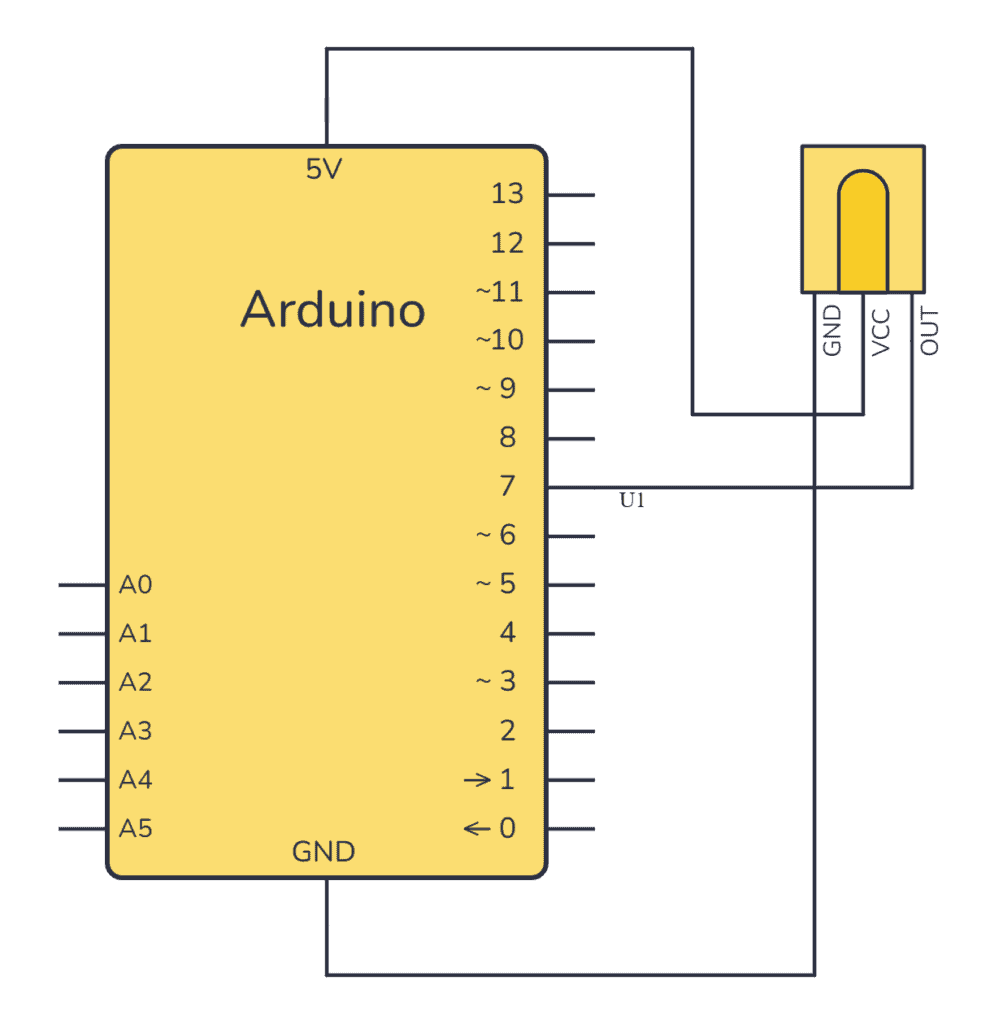
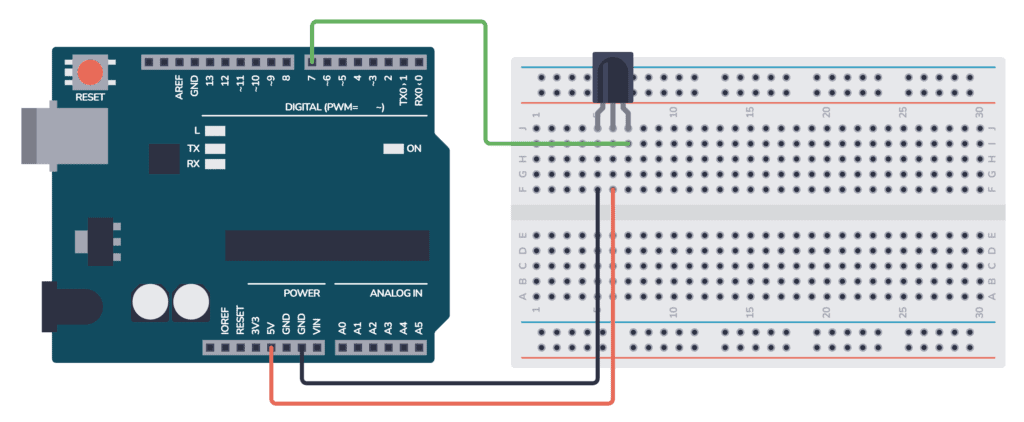
Connect your TSOP312 IR receiver to the Arduino UNO as follows:
- The VCC pin of the IR receiver goes to the 5V output on the Arduino UNO.
- The GND pin connects to one of the GND pins on the Arduino UNO.
- The OUT pin of the IR receiver connects to digital pin 7 on the Arduino.

The Code
// Using the IRremote library: https://github.com/Arduino-IRremote/Arduino-IRremote
#include <IRremote.hpp>
#define IR_RECEIVE_PIN 2

void setup()
{
  //...
  Serial.begin(9600);
  IrReceiver.begin(IR_RECEIVE_PIN, ENABLE_LED_FEEDBACK); // Start the receiver
}

void loop() {
  if (IrReceiver.decode()) {
      Serial.println(IrReceiver.decodedIRData.decodedRawData, HEX); // Print "old" raw data
      IrReceiver.printIRResultShort(&Serial); // Print complete received data
      IrReceiver.printIRSendUsage(&Serial);   // Print what's required to send this data
      //...
      IrReceiver.resume(); // Enable receiving of the next value
  }
  //...
}
How it Works
The TSOP312 IR receiver demodulates the IR signal from a remote control and outputs a digital signal to the Arduino. The Arduino’s interrupt service routine continuously monitors this signal.
When a remote control button is pressed, the IR receiver demodulates the signal, and the Arduino decodes this using the IRremote library. Then it prints the information about the code received on the serial port.
How To Build the Arduino IR Receiver

- Connect your Arduino UNO to your computer using a USB cable.
- Open your Arduino IDE.
- Install the IRremote library by going to Sketch > Include Library > Manage Libraries and searching for “Arduino-IRremote” by Arduino.
- Copy the provided Arduino code into your IDE’s code window.
- Connect the TSOP312 IR Receiver to the Arduino based on the circuit diagram above.
- Use the appropriate wiring connections as illustrated in the circuit diagram for VCC, OUT, and GND, being careful to place each wire into the correct pin on the Arduino.
- Upload the code to your Arduino UNO.
- Open the serial monitor in the Arduino IDE to observe the printed IR codes when a button is pressed on your remote control.
Remember to select the correct board and port in the Arduino IDE before uploading the code.
Troubleshooting Tips
- If you’re not seeing any output in the serial monitor when you press a button on the remote, double-check that you’re using the correct pins on the Arduino.
- Make sure the IR receiver is properly powered with 5V and GND connections secure.
- Ensure that no objects are blocking the path between the remote control and the IR receiver.
- Verify that the baud rate in the serial monitor matches the baud rate set in your code.
- If you’ve recently uploaded the code and its output is incorrect, press the Arduino’s reset button to ensure proper initialization of the IR receiver module.
More Arduino Tutorials

Basic Electronics for Arduino Makers
Learn the basics that every Arduino maker should know, and it'll open you up to a world of possibilities! Sign up for my circuit tips by email and I'll send you the eBook:
