A popular Arduino Ultrasonic Sensor is the HC-SR04. It’s widely used for non-contact distance measurements and often used in robotics and automation projects. This guide will show you how to connect an HC-SR04 to an Arduino and write a simple program to measure distance.
Requirements
- Arduino Uno (or compatible board)
- HC-SR04 Ultrasonic Sensor
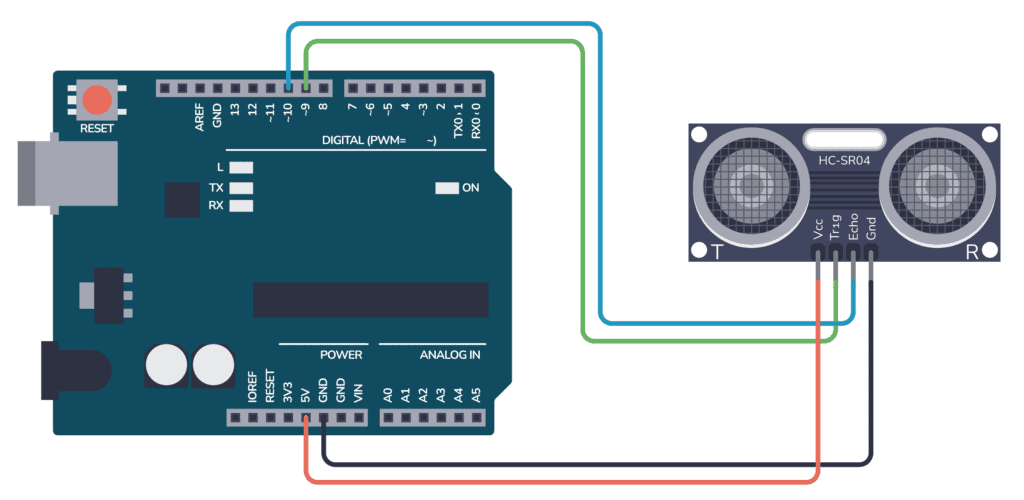
Connection Diagram
Step-by-Step Guide
- Connect the
VCCpin of the HC-SR04 to the 5V output on the Arduino. - Attach the
GNDpin of the HC-SR04 to one of the GND pins on the Arduino. - Connect the
Trigpin to digital pin 9 on the Arduino. - Connect the
Echopin to digital pin 10 on the Arduino.
Arduino Ultrasonic Example Code
Copy and paste the following code into your Arduino IDE. This code will trigger the ultrasonic sensor to send a pulse and then listen for its echo, calculating and printing the distance as a result.
// Define the Trig and Echo pin connections
const int trigPin = 9;
const int echoPin = 10;

// Define variables to store duration and distance
long duration;
int distance;

void setup() {
  // Start the serial communication
  Serial.begin(9600);

  // Define the Trig and Echo pins as Output and Input
  pinMode(trigPin, OUTPUT);
  pinMode(echoPin, INPUT);
}

void loop() {
  // Clear the trigPin
  digitalWrite(trigPin, LOW);
  delayMicroseconds(2);

  // Sets the trigPin HIGH for 10 microseconds
  digitalWrite(trigPin, HIGH);
  delayMicroseconds(10);
  digitalWrite(trigPin, LOW);

  // Reads the echoPin, returns the sound wave travel time in microseconds
  duration = pulseIn(echoPin, HIGH);

  // Calculating the distance
  distance = duration * 0.034 / 2; // Speed of sound wave divided by 2 (go and back)

  // Displays the distance on the Serial Monitor
  Serial.print("Distance: ");
  Serial.print(distance);
  Serial.println(" cm");

  // Delay 500 milliseconds before next measurement
  delay(500);
}
Troubleshooting Tips
- Make sure your Arduino IDE’s Serial Monitor is set to the same baud rate (9600 in this case) to see the output.
- Ensure that the trig and echo pins are correctly defined and connected.
- If the sensor does not seem to be working, check all connections and verify that your Arduino board is functioning properly.
How This Sensor Works
The HC-SR04 ultrasonic sensor works by using the principles of sonar to measure distance. Here’s a brief explanation of its working mechanism:
- Triggering an Ultrasonic Pulse: The sensor has a transmitter and a receiver. When you trigger a pulse (using the Trig pin), the transmitter sends a short burst of ultrasonic sound waves.
- Sound Wave Propagation: Once the ultrasonic pulse is sent, it travels through the air until it hits an object and gets reflected back towards the sensor.
- Receiving the Echo: The receiver part of the sensor (connected to the Echo pin) waits for the reflected sound waves to return. The time taken from emitting the pulse to receiving the echo is measured.
- Calculating Distance: You can find the distance to the object based on the time it took for the sound waves to return. Since the speed of sound in air is approximately 343 meters per second, you can calculate the distance by using the formula
distance = (speed of sound * time)/2. (Divide by 2 because the sound wave travels to the object and then back again, so you need only half the total travel time).
This operation happens very quickly and can be repeated in rapid succession, allowing the sensor to provide real-time measurements of distance to the nearest object in front of it.
Further Resources
For more information on the HC-SR04 Ultrasonic Sensor, check out the datasheet and other tutorials for advanced projects involving this sensor.
Feel free to ask questions or leave feedback about this Arduino ultrasonic guide in the comments section below. If there’s a specific component or project you’d like to see featured, let us know!
More Arduino Tutorials
Basic Electronics for Arduino Makers
Learn the basics that every Arduino maker should know, and it'll open you up to a world of possibilities! Sign up for my circuit tips by email and I'll send you the eBook: