I built this Arduino radar project, where I control the brightness of an LED with my breath. In this tutorial, I will show you exactly how to do it.
It was an experiment to get the XeThru radar to work with Arduino. I plan to expand on this later and build more useful applications.
And I will share with you how to connect the hardware, and how to create the Arduino code.
Just to be clear: This is not a sonar pretending to be a radar. This is a radar. With electromagnetic waves.
The Hardware
XeThru is a radar module from Novelda. You can use it to detect movement in a room, and even measure the breath of a person, without contact.
Since it’s using electromagnetic waves, you could build it into your wall or some other object, to create an invisible intruder alarm sensor.
For example:
Basic Electronics for Arduino Makers
Learn the basics that every Arduino maker should know, and it'll open you up to a world of possibilities! Sign up for my circuit tips by email and I'll send you the eBook:
You could build it into an alarm clock, and place it on your nightstand. Without anything connected to your body or your bed.
Then it would monitor your breathing pattern and your movements throughout the night. This information can help you understand the quality of your sleep. Are you getting the sleep cycles you need?
Or, you could build it into a handheld device for the police. They can place it on a door to see if there is anyone in the room before entering.
There are other radars available, like these:
http://reactancelabs.com/?p=293
http://hackaday.com/2014/06/14/the-first-arduino-radar-shield/
But they’re quite big, because of their antennas.
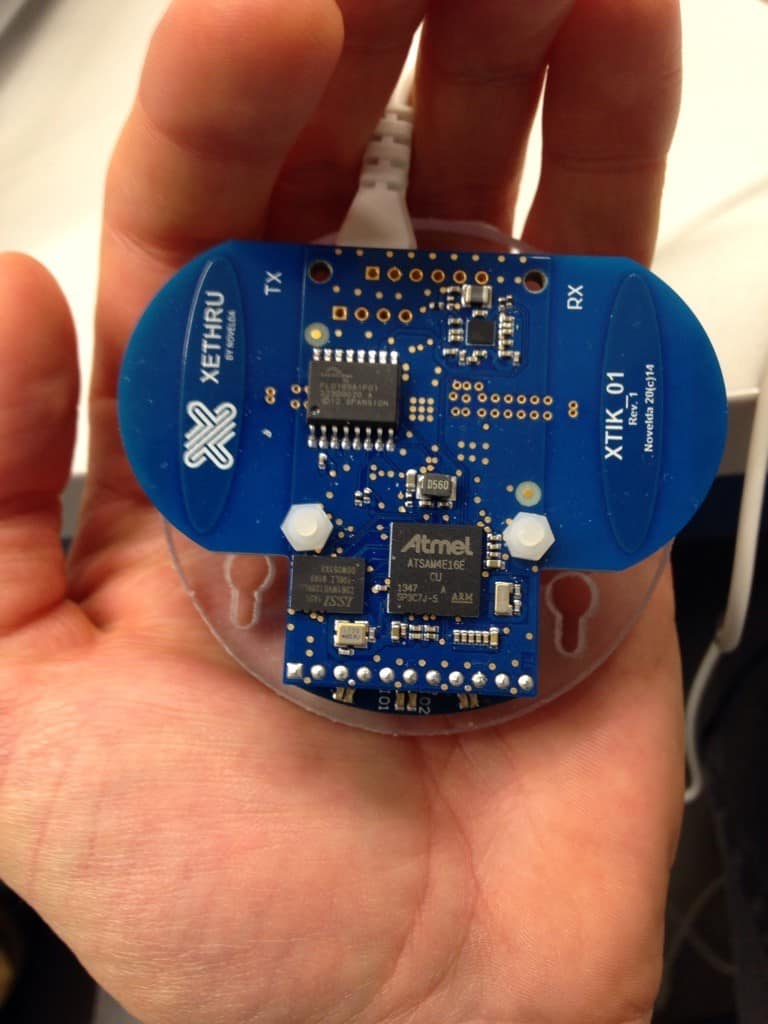
The XeThru module fits in my hand:
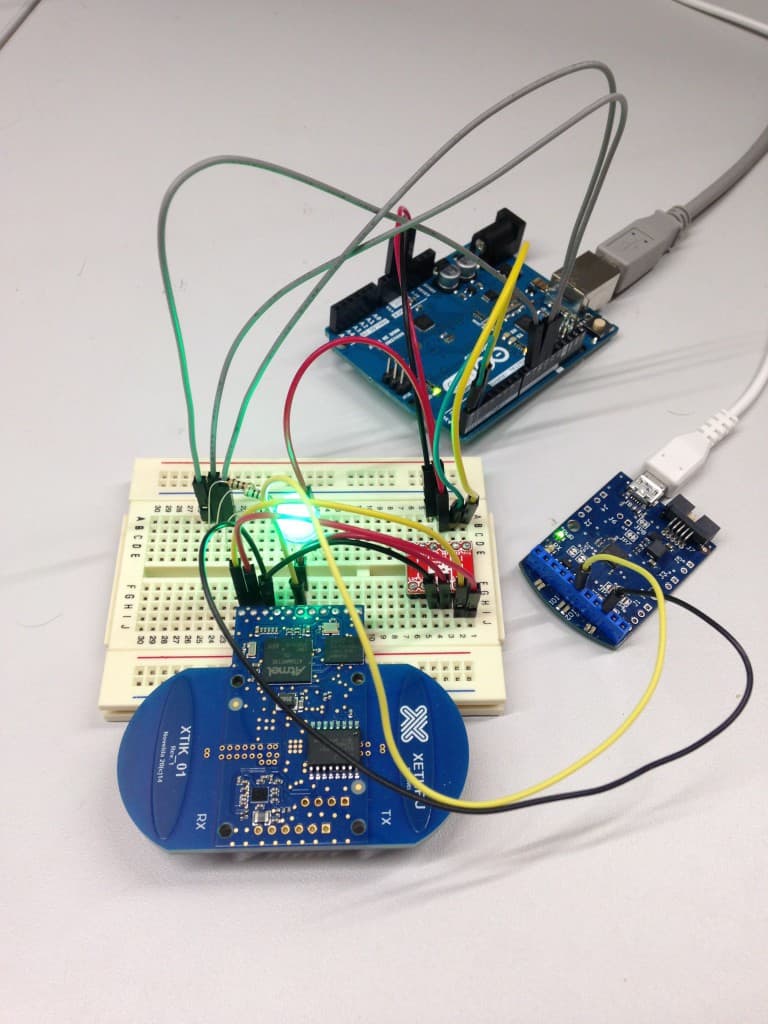
How To Connect
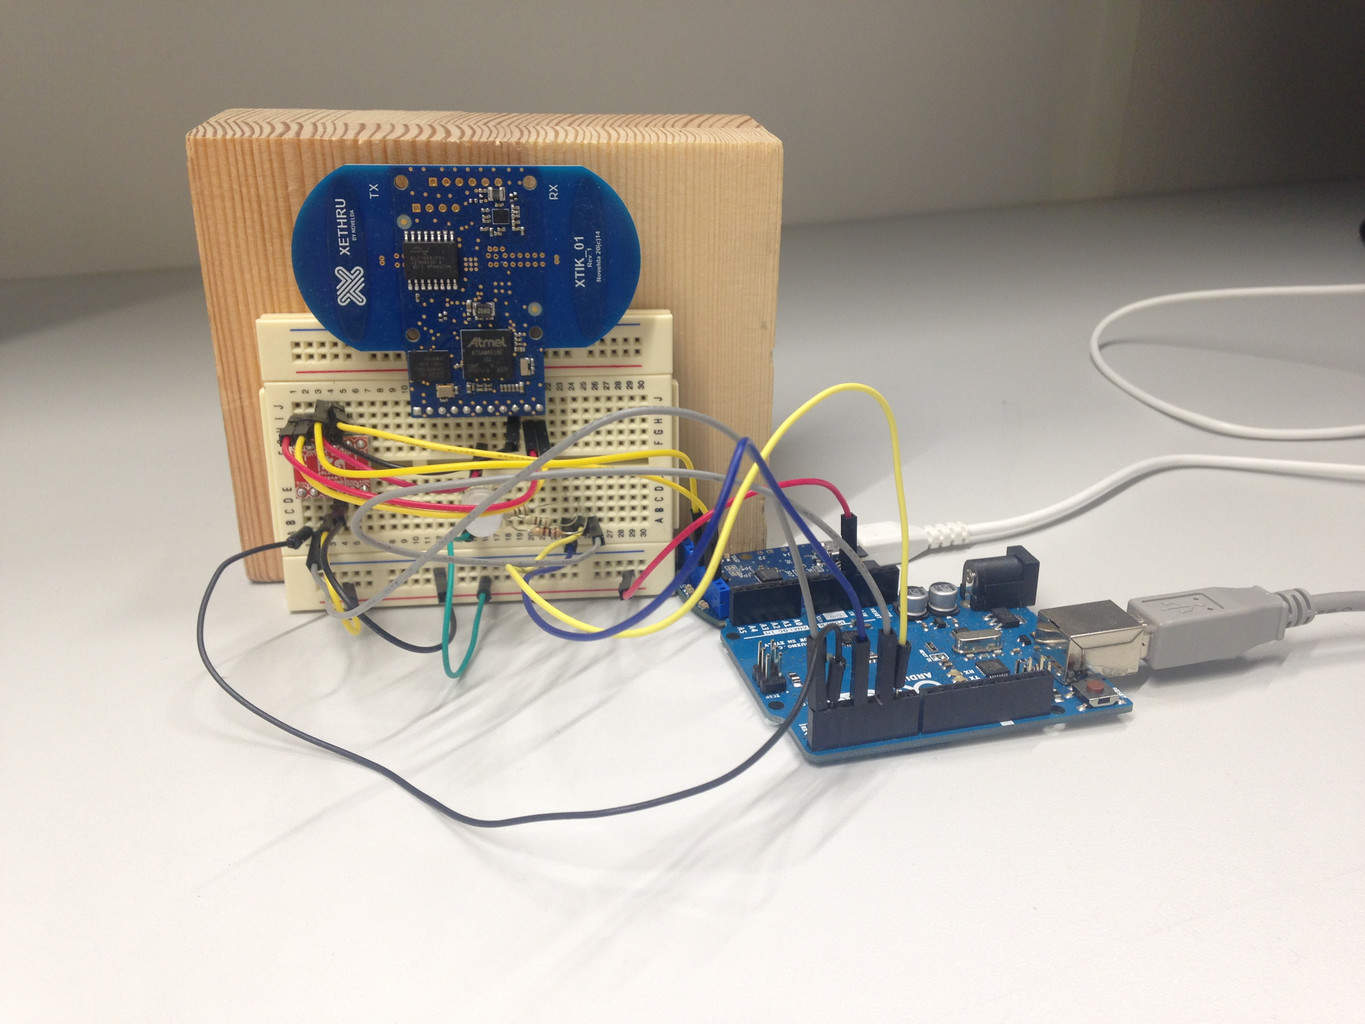
You control the XeThru radar module with two UART pins.
I used an Arduino UNO, with an RGB LED and three 100 Ohm resistors.
The module uses 2.8V levels. Since my Arduino uses 5V levels, I needed a voltage level converter. Other than that, it was pretty straightforward.
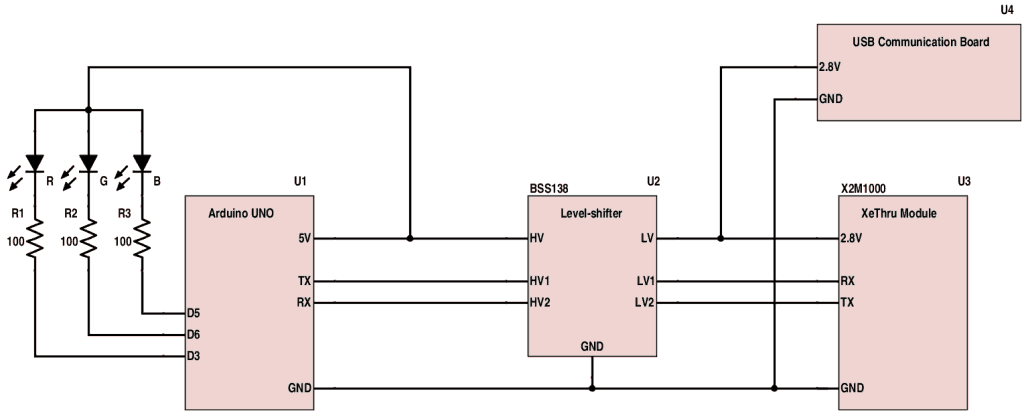
The level shifter I used, was a BSS138 board from Tinkersoup here in Berlin.
To make it work, I also needed a 2.8V supply. Luckily, the USB module for the XeThru radar has a 2.8V supply pin that I could use.
Pitfall:
I spent a lot of time scratching my head in the beginning. I didn’t get any response from the radar! The reason was that I had forgotten to connect the ground…
Writing Code for the Arduino Radar
From the documentation of the serial protocol of the radar, I found out how to get the radar to send me respiration data:
- Reset the radar
- Load an app
- Set configurations (if any)
- Start the app
In the beginning, I had some problems. I just didn’t get any respiration data from the radar. After discussing the problem on the XeThru forum, I found that I had the wrong byte order for the application code.
I fixed that, and data came streaming in!
Type Conversion
Another thing I was struggling with, was type conversion. And with only an RGB LED as my output, it was a bit hard to debug. So I connected another Arduino with SPI, which I could use as a debugging console for a while, and got the type conversion sorted out.
I parsed the data that was coming in and used the movement value to set the brightness of the LED. This way, the LED faded in and out with the tiny movement of my body when breathing in and out.
Really cool to experience!
The Arduino did not process the data fast enough, so I also added a function to empty the buffer and sync the data every time I fetched a new measurement. This way, I always got fresh data.
I’ve created a GitHub repository for the Arduino radar code, where you can find the latest version of the code. The plan is to turn it into a proper Arduino library for the XeThru radar.
The code I used at the beginning
//LED pins
const int red_pin = 3;
const int green_pin = 6;
const int blue_pin = 5;


// Radar constants
const unsigned char xt_start = 0x7D;
const unsigned char xt_stop = 0x7E;
const unsigned char xt_escape = 0x7F;

const unsigned char xts_spc_appcommand = 0x10;
const unsigned char xts_spc_mod_setmode = 0x20;
const unsigned char xts_spc_mod_loadapp = 0x21;
const unsigned char xts_spc_mod_reset = 0x22;
const unsigned char xts_spc_mod_setledcontrol = 0x24;
const unsigned char xts_spr_appdata = 0x50;

const long xts_id_app_resp = 0x1423a2d6;
const long xts_id_resp_status = 0x2375fe26;

const unsigned char xts_sm_run = 0x01;
const unsigned char xts_sm_normal = 0x10;
const unsigned char xts_sm_idle = 0x11;

const unsigned char xts_val_resp_state_breathing = 0; 		// Valid RPM detected Current RPM value
const unsigned char xts_val_resp_state_movement = 1; 		// Detects motion, but can not identify breath 0
const unsigned char xts_val_resp_state_movement_tracking = 2;	// Detects motion, possible breathing 0
const unsigned char xts_val_resp_state_no_movement = 3; 	// No movement detected 0
const unsigned char xts_val_resp_state_initializing = 4; 	// No movement detected 0
const unsigned char xts_val_resp_state_unknown = 6;


unsigned char recv_buf[64]; // Buffer for receiving data from radar. Size picked at random


void send_command(const unsigned char * cmd, int len) {

  // Calculate CRC
  char crc = xt_start;
  for (int i = 0; i < len; i++)
    crc ^= cmd[i];


  // Add escape bytes if necessary
  for (int i = 0; i < len; i++) {
    if (cmd[i] == 0x7D || cmd[i] == 0x7E || cmd[i] == 0x7F)
    {
     //TODO: Implement escaping
    }
  }

  // Send xt_start + command + crc_string + xt_stop
  Serial.write(xt_start);
  Serial.write(cmd, len);
  Serial.write(crc);
  Serial.write(xt_stop);

}


int receive_data() {

  // Get response

  char last_char = 0x00;
  int recv_len = 0;  //Number of bytes received

  //Wait for start character
  while (1)
  {
    char c = Serial.read();	// Get one byte from radar

    if (c == xt_escape)
    {
      // If it's an escape character –
      // ...ignore next character in buffer
      Serial.read();
    }
    else if (c == xt_start)
    {
      // If it's the start character –
      // ...we fill the first character of the buffer and move on
      recv_buf[0] = xt_start;
      recv_len = 1;
      break;
    }
  }

  // Start receiving the rest of the bytes
  while (1)
  {
    // read a byte
    char cur_char = Serial.read();	// Get one byte from radar

    if (cur_char == -1) {
      continue;
    }

    // Fill response buffer, and increase counter
    recv_buf[recv_len] = cur_char;
    recv_len++;

    // is it the stop byte?
    if (cur_char == xt_stop) {
      //setColor(255, 0, 0, 1.0);
      if (last_char != xt_escape)
        break;  //Exit this loop
    }

    // Update last_char
    last_char = cur_char;
  }


  // Calculate CRC
  char crc = 0;
  char escape_found = 0;

  // CRC is calculated without the crc itself and the stop byte, hence the -2 in the counter
  for (int i = 0; i < recv_len-2; i++)
  {
    // We need to ignore escape bytes when calculating crc
    if (recv_buf[i] == xt_escape && !escape_found) {
      escape_found = 1;
      continue;
    }
    else {
      crc ^= recv_buf[i];
      escape_found = 0;
    }
  }


  // Check if calculated CRC matches the recieved
  if (crc == recv_buf[recv_len-2])
  {
    return 0;  // Return 0 upon success
  }
  else
  {
    return -1; // Return -1 upon crc failure
  }
}


void empty_serial_buffer()
{
  while (Serial.available())
  {
    Serial.read();	// Remove one byte from the buffer
  }
}


void get_respiration_data() {

  //The arduino is not fast enough to receive all the data from the radar (it seems)
  //...so always empty the buffer of old data, so that we are sure we have fresh data
  empty_serial_buffer();

  if (receive_data() != 0)
  {
     //TODO: Something went wrong!
     //blink_green();
     //setColor(255, 0, 0, 1.0);
     return;
  }

  // Now recv_buf should be filled with valid data


  // Check that it's app-data we've received
  if (recv_buf[1] != xts_spr_appdata)
  {
    //TODO: Something went wrong!
    //blink_red();
    return;
  }


  // Check that xts_id_resp_status is correct (just to make sure we are getting the right data)
  long xirs_recv = recv_buf[5] | (recv_buf[4] << 8) | (recv_buf[3] << 16) | (recv_buf[2] << 24);
  if (xirs_recv != xts_id_resp_status)
  {
    //TODO: Something went wrong!
    //blink_red();
    //return;
  }


  float * movement;
  float brightness = 0;

  // State code
  char state_code = recv_buf[10];

  switch (state_code) {
    case xts_val_resp_state_breathing:

      //"Breathing detected:"

      //Point float pointer to the first byte of the float in the buffer
      movement = (float*)&recv_buf[22];

      //Get the float value
      brightness = *movement;

      //Movement is usually between -1 and 1, so move it to 0 to 1 instead:
      brightness += 1.0;
      brightness = brightness/2.0;

      //Cut off values under 0 and over 1
      if (brightness < 0.0)
        setColor(0, 0, 255, 0.0);
      else if (brightness > 1.0)
        setColor(0, 0, 255, 1.0);
      else
        setColor(0, 0, 255, brightness);

      break;
    case xts_val_resp_state_movement:
      // "Movement"
      setColor(255, 255, 0, 1.0);
      break;
    case xts_val_resp_state_movement_tracking:
      // "Movement tracking"
      setColor(0, 255, 0, 1.0);
      break;
    case xts_val_resp_state_no_movement:
      // "No movement"
      setColor(255, 255, 255, 1.0);
      break;
    case xts_val_resp_state_initializing:
      // "Initializing"
      setColor(255, 0, 255, 1.0);
      break;
    case xts_val_resp_state_unknown:
      // "State unknown"
      setColor(255, 0, 0, 1.0);
      break;
    default:
      setColor(255, 0, 0, 1.0);
      break;
  }

}

// RESET MODULE
void reset_module() {
  send_command(&xts_spc_mod_reset, 1);
  if (receive_data()) 	// Receives the "booting" state
    blink_blue();
  if (receive_data()) 	// Receives the "ready" state
    blink_blue();
}

// Load respiration app
void load_respiration_app()
{
  //Fill send buffer
  unsigned char send_buf[5];
  send_buf[0] = xts_spc_mod_loadapp;
  send_buf[4] = (xts_id_app_resp >> 24) & 0xff;
  send_buf[3] = (xts_id_app_resp >> 16) & 0xff;
  send_buf[2] = (xts_id_app_resp >> 8) & 0xff;
  send_buf[1] = xts_id_app_resp & 0xff;

  //Send the command
  send_command(send_buf, 5);
  if (receive_data()) 	// Receives the acknowledge
    blink_blue();
}

// Execute application
void execute_app()
{
  //Fill send buffer
  unsigned char send_buf[2];
  send_buf[0] = xts_spc_mod_setmode;
  send_buf[1] = xts_sm_run;

  //Send the command
  send_command(send_buf, 2);
  if (receive_data()) 	// Receives the acknowledge
    blink_blue();
}


void setColor(int red, int green, int blue, float brightness)
{
  analogWrite(red_pin, 255 - red * brightness);
  analogWrite(green_pin, 255 - green * brightness);
  analogWrite(blue_pin, 255 - blue * brightness);
}

void blink_red() {
  while(1) {
    setColor(255, 0, 0, 1.0);
    delay(500);
    setColor(0, 0, 0, 0.0);
    delay(500);
  }
}

void blink_green() {
  while(1) {
    setColor(0, 255, 0, 1.0);
    delay(500);
    setColor(0, 0, 0, 0.0);
    delay(500);
  }
}

void blink_blue() {
  while(1) {
    setColor(0, 0, 255, 1.0);
    delay(500);
    setColor(0, 0, 0, 0.0);
    delay(500);
  }
}

void setup() {
  Serial.begin(115200);

  pinMode(green_pin, OUTPUT);
  pinMode(blue_pin, OUTPUT);
  pinMode(red_pin, OUTPUT);


  //Test RGB-led
  setColor(255, 0, 0, 1.0);
  delay(500);
  setColor(0, 0, 0, 0.0);
  delay(500);

  setColor(0, 255, 0, 1.0);
  delay(500);
  setColor(0, 0, 0, 0.0);
  delay(500);

  setColor(0, 0, 255, 1.0);
  delay(500);
  setColor(0, 0, 0, 0.0);
  delay(500);


  reset_module();
  load_respiration_app();
  execute_app();

  //Set initializing color
  setColor(255, 0, 255, 1.0);

}


void loop() {
  get_respiration_data();
}
More Arduino Tutorials
Basic Electronics for Arduino Makers
Learn the basics that every Arduino maker should know, and it'll open you up to a world of possibilities! Sign up for my circuit tips by email and I'll send you the eBook:
Great tutorial! too bad, this little device costs 400$… which is too expensive, in my opinion. There are board based on HB 100 Microwave Sensor Module, at around 4$ that can detect movement through walls
I don’t know the HB 100 sensor. But I think it’s a lot less sensitive. I doubt that you can measure breathing with it. But yeah, the price difference is a bit high at the moment. But WiFi modules were also pricey a few years ago, and now you can find them for $5 =)
Oyvind
Do you have tested the device through walls ? Does it still work ?
Given that the X4M200 uses EM that can go through wall , that could be possible, depending on the frequency used.
Yes, it can work. But it depends on the material of the wall.
Best,
Oyvind
Hi Oyvind,
What is the reference of the usb communication board and where to find it ?
Best regards,
Chouaibou NSANGOU.
Hi,
The USB communication board is custom made by XeThru. But their newer boards don’t need an external communication board.
Best,
Oyvind
From the specs of the X2M200 sensor it should be able to feed it 5V (directly from the Arduino) and use a 3.3V to 5V level shifter for communication, is that right?
Thanks :-)
That sounds right, yes. I haven’t worked with this in a while though, so double check what I say ;)
Hello Øyvind, great tutorial!
Do you know if it would work with the new X4M200 respiration sensor?
Thanks!
Hi Nanaui,
Thanks =)
I think the protocol should be the same, and in that case it should work. But I haven’t used that chip, so I can’t make any promises :)
Oyvind
Thanks! I will try it!!
Hi, I’d like to know if the USB communication board is included in the Rader or is needed to buy it in other ways.
Hey, they have different products with different features. Check out their webshop for the latest updates: https://www.xethru.com/shop/
Best,
Oyvind
Such a great project and tutorial! I would like to ask what if there are multiple people in the same room? Will it pick up messy data?
Thanks =)
It could. But it all depends on how you process the data. The radar outputs raw radar data, which is lots of pulses, then you have to create algorithms to process it.
Detecting two persons breathing, could be easy or it could be hard, depending on their position and if they are moving a lot.
Best,
Oyvind
Hi,
At the beginning of the code, you mentioned that the definitions are for Arduino mega board what changes should I make for other Arduino boards and where can I find the reference for performing the same.
Hi!
Hope you are doing well.
Is it also possible to purchase this device from you? I’m looking forward to hear from you.
Kind regards,
Maarten
Hi, I don’t sell this, but you can purchase from Novelda: https://novelda.com/
Hello! First of all, congratulations on this amazing project.
I bought one of these radars years ago, but just now I finally dare to experiment with it.
Could you help me list what each of those printed numbers means?
There’s a list anywhere that I could look for?
I understood some of them, like the first and last ones, that some groups are related to the movement, some with the breathing but it is far away to be clear at this moment. Can you help me?
I mean those:
Received: 7D 50 6C A1 75 23 90 2 0 0 1 0 0 0 0 0 0 0 12 84 DE 3E 3 0 0 0 DB 73 AE 42 ED FC A9 41 ED 7E
Hi Rafael, it’s been too long since I made this so I can’t remember. But if you get a hold of the datasheet, you’ll find all the information there.
Another thing, this code here is the same one you used on your YouTube video? As far as I understand the code needs three leads, and in your cool video you are using just one. That’s fine, but I wonder if there are other important differences. Because I want to remake exactly what you did before I move to experiment with new things :)
The radar module communicates via UART (two wires). And it needs the power supply (two wires).
I can’t remember using only one wire, but if I do somewhere I guess I must have put the radar into streaming mode so that it streams data continuously and thereby only needing the RX pin.